SDK 编译部署
概述
MTT E300 Software SDK(Software Development Kit)是面向 MTT E300 的软件开发工具包,基于 Yocto Project 构建,提供完整的编译、部署和定制化解决方案。
SDK 开发环境部署组件
| 编号 | 文件名 | 说明 |
|---|---|---|
| 1 | yocto_dev_img_ubuntu20.04:v3.5.tar.gz | SDK 运行依赖的 Docker image |
| 2 | runYoctoDevDock_v3.5.sh | Docker image 配置和运行脚本 |
| 3 | m1000-soc-sw-sdk | SDK 编译部署目录 |
| 4 | downloads.tar.gz | SDK 编译所依赖的库和中间件 |
| 5 | ubuntu-rootfs.ext4 | 编译 rootfs 镜像需要的基础文件 |
| 6 | generate_wic.sh | u-boot 编译后更新 wic 的脚本文件 |
| 7 | source code | 项目开发中需要修改的代码仓库 |
SDK Repo 目录结构
m1000-soc-sw-sdk/
├── README                      # Readme 文档,链接自 meta/base/README
├── .config                     # 用户配置文件
├── fip-prebuild                # fip.bin
├── downloads                   # SDK 编译依赖库
├── setup_env.sh                # 环境配置脚本,链接自 meta/base/setup_env.sh
└── meta/
    ├── base/                   # 基础配置层
    │   ├── conf/
    │   │   ├── bblayers.conf   # 默认 bblayers.conf 模板文件
    │   │   └── user_default.conf # 用户默认设置文件
    │   └── setup_env.sh        # 环境配置脚本
    ├── meta-test/           # 测试层
    ├── meta-sample/         # 示例层(应用/demo)
    ├── meta-midware/        # 中间件集成层
    ├── meta-bsp/            # BSP 层(Bootloader/TF-A/SCP 固件等)
    ├── meta-distro/         # 发行版策略层(镜像构建)
    ├── meta-m1000/         # 硬件抽象层(机器特定配置)
    └── poky/                   # Yocto 官方 Poky 项目 v(Kirkstone)
        ├── bitbake/
        ├── meta/
        ├── meta-poky/
        ├── meta-skeleton/
        ├── meta-selftest/
        ├── meta-yocto-bsp/
        ├── oe-init-build-env
        └── scripts/
运行原理
编译产物说明
| 产物名称 | 说明 | 用途 |
|---|---|---|
u-boot.bin | U-Boot 引导程序 | 芯片启动第一阶段 |
m1000_entry_v1.0.0-oem.bin | Entry Table 配置 | 芯片启动配置 |
soc-firmware-image.wic | 完整固件镜像 | 包含所有启动组件 |
Image | Linux 内核镜像 | 操作系统内核 |
*.dtb | 设备树文件 | 硬件描述 |
m1000-image-ubuntu-*.wic | 根文件系统镜像 | 完整系统镜像 |
部署编译流程
- 安装 Docker
- 配置 Docker image 环境
- 启动 Docker image
- 建立 Yocto 编译所需目录
- 配置 SDK 编译环境变量
- 添加源码路径
- 修改相关模块代码或 rootfs 定制化修改
- 执行编译命令,生成
Image,并用运行验证
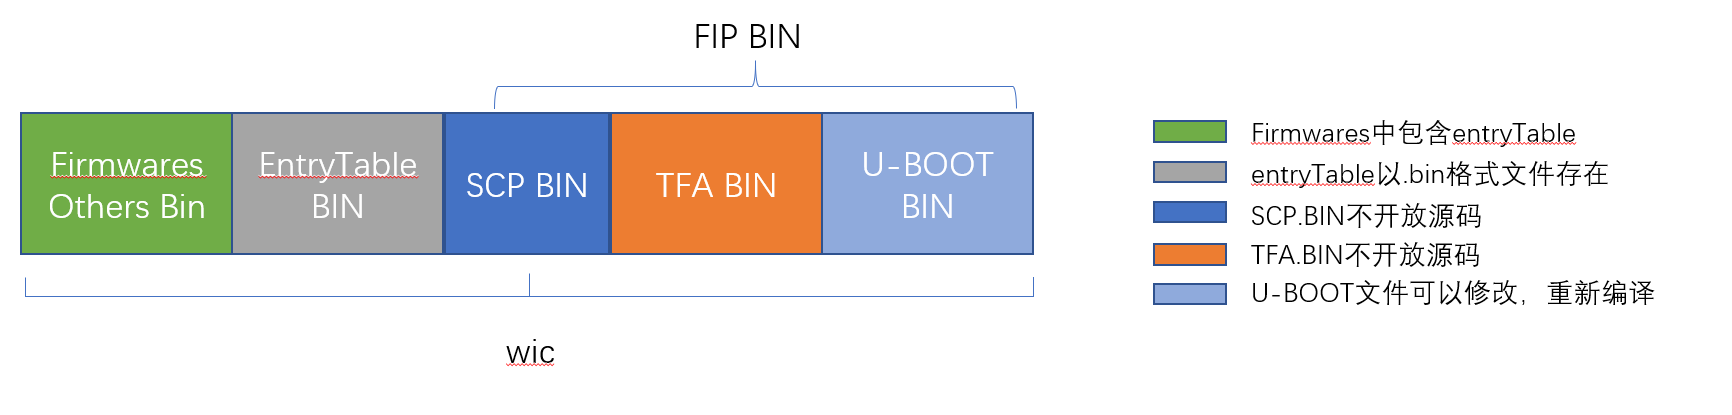
固件组成说明
wic 文件结构:
wic包含:firmwares + entrytable(包含在 firmwares 中)+ scp.bin + tfa.bin + u-boot.bin
fip.bin 结构:
fip.bin包含:scp.bin + tfa.bin + u-boot.bin
快速开始
准备文件
从 TOS 下载以下文件:
yocto_dev_img_ubuntu20.04:v3.5.tar.gz- Docker 镜像runYoctoDevDock_v3.5.sh- Docker 启动脚本downloads.tar.gz- 编译依赖库ubuntu-rootfs.ext4- 根文件系统基础镜像generate_wic.sh- WIC 打包脚本
TOS 下载路径:
tos://ab100-sw/AI MODULE/AI MODULE UBOOT (平台化版本)/v1.4.0/代码仓库/Docker/Rootfs/
安装步骤
步骤 1:安装 Docker
# 安装 Docker 及基础依赖
sudo apt update
sudo apt install -y net-tools docker.io
步骤 2:配置 Docker 权限
# 配置 Docker 权限
sudo usermod -aG docker $USER
sudo groupadd docker
sudo systemctl restart docker
sudo newgrp docker

# 验证 Docker 权限
docker ps
步骤 3:加载 Docker 镜像
# 加载 Docker 镜像
tar xvf yocto_dev_img_ubuntu20.04.tar
gunzip -c yocto_dev_img_ubuntu20.04:v3.5.tar.gz | docker load
步骤 4:启动 Docker 容器
# 启动 Docker 容器(首次需运行两次)
./runYoctoDevDock_v3.5
注意:首次执行需要运行两次,第一次用于生成用户目录。
步骤 5:准备 SDK 工作环境
# 创建工作目录
mkdir -p ~/sdk
cd ~/sdk

# 克隆 SDK 源码
git clone git@gitee.com:MooreThreadsNDA/m1000-soc-sw-sdk.git
cd m1000-soc-sw-sdk

# 解压依赖
tar zxvf ../downloads.tar.gz

# 如果下载 ext4 文件,直接解压放在 downloads 下
tar zxvf ubuntu-rootfs_basic_20250626_32G.ext4.tgz
步骤 6:配置编译参数
cd m1000-soc-sw-sdk
source setup_env.sh build
执行 menuconfig 进行配置(通常保持默认即可):
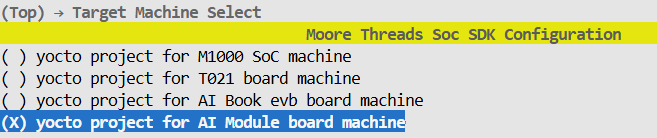
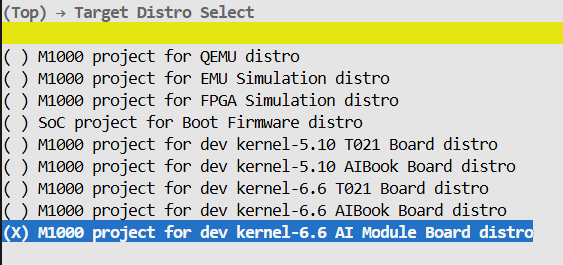
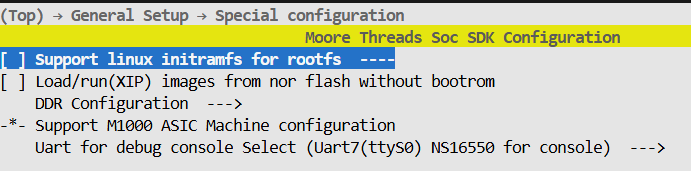
通常无需修改 .config,保持默认设置即可。如需自定义配置,可手动修改 .config 文件。
执行成功后,会自动进入 build/ 目录,准备开始编译。
步骤 7:生成用户签名
# 生成用户签名
fip-prebuild/cert_create -n -k --key-alg rsa --key-size 2048 \
    --nt-fw-key fip-prebuild/pri_user.pem
重要:同一家公司,请使用同一签名,否则混刷 soc.wic 可能会导致不开机。
编译
添加源码路径
# 克隆源码
git clone git@gitee.com:MooreThreadsNDA/m1000-entrytable.git
git clone --recurse-submodules git@gitee.com:MooreThreadsNDA/m1000-uboot.git -b release_M1000_1.4.0
git clone git@gitee.com:MooreThreadsNDA/m1000-linux-kernel.git
cd m1000-linux-kernel
git checkout release_M1000_1.4.0
# 使用 devtool 添加源码路径
devtool modify -n m1000-entry-table-tool ../m1000-entrytable
devtool modify -n u-boot-mt ../m1000-uboot
devtool modify -n linux-mthreads ../m1000-linux-kernel
如果需要修改路径或删除路径,可使用 devtool reset <module>,然后重新执行 devtool modify -n 命令进行更新。
编译步骤概述
- 编译 u-boot 源码,生成
u-boot.bin - 编译 entry-table 源码,生成
m1000_entry_v1.0.0-oem.bin - 打包生成
soc-firmware-image.wic - 如果 u-boot 代码有更新:
- 执行
generate_wic.sh脚本,快速替换fip.bin中的原始u-boot.binwic 文件
- 执行
- 如果重新编译了
m1000_entry_v1.0.0-oem.bin,请替换fip-prebuild/firmware下的相应文件,并重新编译soc-firmware-image.wic - 对最终生成的
soc-firmware-image.wic文件进行签名 - 编译 image & dtb
- 编译
rootfs.wic
编译 U-Boot
# 使用 devtool modify 创建 u-boot 源码路径
devtool modify -n u-boot-mt ../m1000-uboot/

# 执行环境配置脚本
source setup_env.sh build

# 执行成功后会自动进入 build 目录
# 编译 u-boot
bitbake u-boot-mt
查看编译输出目录:
# 查看编译输出目录
ls build/tmp/deploy/images/aimodule/

u-boot-aimodule.bin
u-boot-aimodule.bin-aimodule-m1000
u-boot.bin
u-boot.bin-aimodule-m1000
u-boot-mt-initial-env-aimodule-m1000
如果编译成功,会在上述目录中生成 u-boot.bin 文件。
如果编译失败,可执行以下命令清除并重新编译:
# 清除并重新编译
bitbake u-boot-mt -c cleanall
cleanall 也适用于清除其他镜像的编译缓存。
编译 Entry-Table
如果修改了 GPIO 配置,需要重新编译 entry-table:
devtool modify -n m1000-entry-table-tool /home/xxx/m1000-entrytable
source setup_env.sh build
bitbake m1000-entry-table-tool
ls build/tmp/deploy/images/aimodule/
m1000_entry_oem.bin
m1000_entry_v1.0.0-oem.bin
编译 soc-firmware-image.wic
wic 包含:firmwares + entrytable(包含在 firmwares 中)+ scp.bin + tfa.bin +
u-boot.bin。fip.bin 包含:scp.bin + tfa.bin + u-boot.bin。
默认情况下,build/tmp/deploy/images/aimodule/ 目录下没有 .wic 文件。
初次编译 soc-firmware-image.wic 时,直接按照下述流程编译:
source setup_env.sh build
cp ../fip-prebuild/fip.bin ./tmp/deploy/images/aimodule/.
bitbake soc-firmware-image
ls build/tmp/deploy/images/aimodule/
soc-firmware-image-aimodule-xxx.rootfs.manifest
soc-firmware-image-aimodule-xxx.testdata.json
soc-firmware-image-aimodule-xxx.rootfs.wic
如果
entrytable有改动,编译完成后替换build/tmp/deploy/images/aimodule/firmwares目录下对应文件m1000_entry_v1.0.0-oem.bin,再重新编译wic,并替换fip-prebuild/firmware/下的对应文件。如果修改了
u-boot源码,重新编译的 bin 可以通过脚本generate_wic.sh方便地替换旧的u-boot.bin,并且重新打包成新的soc-firmware-image.wic。
替换 wic 中的 u-boot.bin 并重新打包
修改 u-boot 代码后,按照下面步骤编译打包 wic 文件:
# 测试 fiptool 是否可用
fiptool version

# 此脚本针对修改 u-boot 源码后,重新打包 wic
./generate_wic.sh
generate_wic.sh脚本替换fip.bin中的u-boot.bin,并且重新打包soc-firmware-image.wic。
编译 Kernel Image 和 DTB
在 m1000-soc-sw-sdk 目录下执行:
# 指定内核源码路径(使用绝对路径)
devtool modify -n linux-mthreads /home/xxx/m1000-linux-kernel/

# 执行环境配置脚本
source setup_env.sh build

# 执行成功后会自动进入 build 目录
# 编译 kernel image 和 dtb
bitbake linux-mthreads
在 build/tmp/deploy/images/aimodule/ 目录下会生成对应 Image 和 DTB 文件:
ls build/tmp/deploy/images/aimodule/

Image
Image-aimodule.bin
Image.gz
Image.gz-aimodule.bin
m1000-aimodule-aimodule.dtb
m1000-aimodule.dtb
modules-aimodule.tgz
编译 Kernel Image 和对应的 debs
在 m1000-soc-sw-sdk 目录下执行:
# 执行环境配置脚本
source setup_env.sh build

# 执行成功后会自动进入 build 目录
bitbake linux-mthreads -c cleanall

# 编译 Kernel Image & debs
build-linux-deps.sh
在 build/tmp/deploy/images/aimodule/ 目录下会生成对应 Image 和 deb 文件:
ls build/tmp/deploy/images/aimodule/debs
linux-headers-6.6.10_6.6.10-xxx_arm64.deb
linux-image-6.6.10_6.6.10-xxx_arm64.deb
linux-libc-dev_6.6.10-xxx_arm64.deb
编译 Rootfs
请先确认执行脚本
build-linux-deps.sh编译了包含kernelimage、linux headers、ko的deb包。 即build/tmp/deploy/images/aimodule/debs目录下的deb包。
将 musa 包移入 build/tmp/deploy/images/aimodule/debs/ 目录下,编译 rootfs 时自动安装 musa 包。
如果宿主机和 rootfs 的架构不一致,执行下列命令:
# 在宿主机
sudo apt update
sudo apt install qemu-user-static binfmt-support
sudo update-binfmts --enable qemu-aarch64
在 m1000-soc-sw-sdk 目录下执行:
# 执行环境配置脚本
source setup_env.sh build

# 执行成功后会自动进入 build 目录
# 编译 rootfs
bitbake m1000-image-ubuntu
在 build/tmp/deploy/images/aimodule/ 目录下会生成对应 rootfs 文件:
ls build/tmp/deploy/images/aimodule/
m1000-image-ubuntu-aimodule-xxx.rootfs.ext4
m1000-image-ubuntu-aimodule-xxx.rootfs.wic
m1000-image-ubuntu-aimodule-xxx.rootfs.manifest
m1000-image-ubuntu-aimodule-xxx.rootfs.testdata.json
编译 U 盘启动 iso 镜像
cd m1000-soc-sw-sdk
menuconfig
# 打开配置选项
# (TOP)-> General Setup -> Special configuration -> Support linux initramfs for rootfs

# 编译出 cpio
bitbake m1000-image-ubuntu

ll mt-soc_sw_sdk/build/tmp/deploy/images/aimodule/minimal-image-initramfs-aimodule.cpio

cd mt-soc_sw_sdk/udisk-upgrade-aimodule
chmod 755 *.sh
sudo ./env_init.sh
sudo ./mk_all.sh
ll soc_sw_sdk/udisk-upgrade-aimodule/out/m1000-aimodule-ubuntu-xxx.iso
使用此 iso 镜像制作 U 盘启动盘,参考系统烧录和系统安装指南进行系统烧录。