Torch-MUSA
简介
MUSA 概述
MUSA (Metaverse Unified System Architecture) 是摩尔线程公司为摩尔线程 GPU 推出的一种通用并行计算平台和编程模型。它提供了 GPU 编程的简易接口,用 MUSA 编程可以构建基于 GPU 计算的应用程序,利用 GPU 的并行计算引擎来更加高效地解决比较复杂的计算难题。同时摩尔线程还推出了 MUSA 工具箱(MUSA Toolkits),工具箱中包括 GPU 加速库、运行时库、编译器、调试和优化工具等。MUSA Toolkits 为开发人员在摩尔线程 GPU 上开发和部署高性能异构计算程序提供软件环境。
更多详情,参见 MUSA 官方文档。
PyTorch 概述
PyTorch 是一款开源的深度学习编程框架,可以用于计算机视觉,自然语言处理,语音处理等领域。 PyTorch 使用动态计算,这在构建复杂架构时提供了更大的灵活性。PyTorch 使用核心 Python 概念,如 类、结构和条件循环,因此理解起来更直观,编程更容易。此外,PyTorch 还具有可以轻松扩展、快速实现、生产部署稳定性强等优点。
更多详情,参见 PyTorch 官方文档。
torch_musa 概述
为了摩尔线程 GPU 能支持开源框架 PyTorch,摩尔线程公司开发了 torch_musa。在 PyTorch
v2.0.0 基础上,torch_musa 以插件的形式来支持摩尔线程 GPU,最大程度与 PyTorch 代码解耦,便于代码维护与升级。torch_musa 利用 PyTorch 提供的第三方后端扩展接口,将摩尔线程高性能计算库动态注册到 PyTorch 上,从而使得 PyTorch 框架能够利用摩尔线程显卡的高性能计算单元。利用摩尔线程显卡 CUDA 兼容的特性,torch_musa 内部引入了 cuda 兼容模块,使 PyTorch 社区的 CUDA
kernels 经过 porting 后可运行在摩尔线程显卡上,而且 CUDA
Porting 的工作是在编译 torch_musa 的过程中自动进行,这大幅降低了 torch_musa 算子适配的成本,提高模型开发效率。同时,torch_musa 在 Python 前端接口与 PyTorch 社区 CUDA 接口形式上基本保持一致,这极大地降低了用户的学习成本和模型的迁移成本。
本手册主要介绍了基于 MUSA 软件栈的 torch_musa 开发指南。
torch_musa 核心代码目录概述
-
torch_musa/tests测试文件。 -
torch_musa/core主要包含 Python module,提供 amp/device/memory/stream/event 等模块的 Python 前端接口。 -
torch_musa/csrcC++ 侧实现代码;-
csrc/amp提供混合精度模块的 C++ 实现。 -
csrc/aten提供 C++ Tensor 库,包括MUDNN算子适配、CUDA-Porting算子适配等。 -
csrc/core提供核心功能库,包括设备管理、内存分配管理、Stream 管理、Events 管理等。 -
csrc/distributed提供分布式模块的 C++ 实现。
-
m1000_gpu_model_zoo 模型仓库
m1000_gpu_model_zoo旨在演示如何基于 torch_musa 在 MTGPU 进行模型推理加速,帮助开发者在 MTGPU 上快速落地各种 AI 模型推理服务。
环境准备与部署
步骤 1:环境确认
确认操作系统版本
AIOS 1.5.0
确认 musa 和 musa-sdk 版本
musa 5.2.1
musa-sdk 5.1.2
可通过以下指令获得,关注 Version 字段
dpkg -s musa
dpkg -s musa-sdk
步骤 2:驱动更新
执行前提:只有在步骤 1 中检查发现 musa 或 musa-sdk 版本不符合要求时,才需要执行本步骤。如果版本已正确,请跳过步骤 2,直接进入步骤 3。
安装包下载、安装命令和安装验证流程,请参考 MUSA 安装。
步骤 3:安装 torch、torch_musa、triton
安装脚本:
pip install ./torch-<package_version>.whl
pip install ./torch_musa-<package_version>.whl

pip install triton-<package_version>.whl
步骤 4:环境验证
python3 -c "import torch;import torch_musa;print(torch.musa.is_available())"
输出 True 证明 torch_musa 环境安装正确。
可能出现的问题:
输出 mudnn.so 找不到
执行:
export PATH=/usr/local/musa/bin:${PATH}
export LD_LIBRARY_PATH=/usr/local/musa/lib:${LD_LIBRARY_PATH}
输出 Error in cpuinfo: prctl(PR_SVE_GET_VL) failed
torch_musa 2.7 之前会存在该问题,不影响使用。
NumPy 报错,如 Failed to initialize NumPy 或者
numpy ModuleNotFoundError: No module named 'numpy'
执行 pip3 install numpy==1.26.4
报错 ImportError: libmccl.so.2: cannot open shared object file: No such file or directory
mccl 库在最新的 musa-sdk 中已经包含,请参考 MUSA 安装,更新 musa-sdk。
报错 MUSA driver initialization failed
设备需要连接显示器,输入用户名密码进入桌面。如果没有安全需求,推荐在"设置"->"用户"界面设置为自动登录。
编译安装
torch_musa 源码完全开源,开发者也可以根据实际需要编译源码安装。
编译安装前,需要安装 MUSA Toolkits 软件包、MUDNN 库、MCCL 库、muThrust 库、muAlg 库、muRAND 库、muSPARSE 库。具体安装步骤,请参见相应组件的安装手册。
依赖环境
编译流程
-
向
PyTorch源码打 patch -
编译
PyTorch -
编译
torch_musa
torch_musa 2.9.0 是在 PyTorch
v2.9.0 基础上以插件的方式来支持摩尔线程显卡。开发时涉及到对 PyTorch 源码的修改,目前是以打 patch 的方式实现的。PyTorch 社区正在积极支持第三方后端接入,相关
issue
下已有对应 PR。torch_musa 项目也在持续向 PyTorch 社区提交 PR,以减少编译过程中对 PyTorch 打 patch 的需求。
编译步骤
安装依赖
git clone --depth=10 https://github.com/MooreThreads/muThrust.git
cd muThrust
./mt_build.sh -i

git clone --depth=10 https://github.com/MooreThreads/muAlg.git
cd muAlg
./mt_build.sh -i
使用脚本一键编译(推荐)
在初次编译时,需要执行 bash build.sh
(先编译 PyTorch,再编译 torch_musa)。在后续开发过程中,如果不涉及对 PyTorch 源码的修改,那么执行
bash build.sh -m(仅编译 torch_musa)即可。
MAX_JOBS=8 USE_MCCL=0 USE_KINETO=1 bash ./build.sh --clean --wheel
配置说明
| 示例 | 说明 |
|---|---|
-c/--clean | 清理构建产物后再构建 |
-w/--wheel | 生成 wheel 包并安装 |
-p/ --patch | 仅应用补丁,不构建 |
-d/--debug | Debug 模式构建 |
-t/--torch | 仅构建 PyTorch |
-m/--musa | 仅构建 Torch_MUSA |
--fp64 | 编译支持 fp64 数据类型的内核 |
-a/--asan | 启用 AddressSanitizer 内存检测 |
宏定义说明:
| 宏定义 | 默认值 | 说明 |
|---|---|---|
MAX_JOBS | 1 | 用于编译的 CPU 核心数 |
USE_MCCL | 1 | 是否使用 MCCL(MooreThreads 的通信库) |
USE_KINETO | 1 | 是否使用 Kineto 性能分析库 |
分步骤编译
如果不想使用脚本编译,那么可以按照如下步骤逐步编译。
- 在
PyTorch打 patch
# 请保证 PyTorch 源码和 torch_musa 源码在同级目录或者 export PYTORCH_REPO_PATH=path/to/PyTorch 指向 PyTorch 源码
bash build.sh --only-patch
- 编译
PyTorch
cd pytorch
pip install -r requirements.txt
python setup.py install
# debug mode: DEBUG=1 python setup.py install
# asan mode: USE_ASAN=1 python setup.py install
- 编译
torch_musa
cd torch_musa
pip install -r requirements.txt
python setup.py install
# debug mode: DEBUG=1 python setup.py install
# asan mode: USE_ASAN=1 python setup.py install
快速入门
常用环境变量
开发 torch_musa 过程中常用环境变量如下表所示:
| 环境变量示例 | 所属组件 | 功能说明 |
|---|---|---|
export TORCH_SHOW_CPP_STACKTRACES=1 | PyTorch | 当 python 程序发生错误时显示 PyTorch 中 C++ 调用栈 |
export MUDNN_LOG_LEVEL=INFO | MUDNN | 使能 MUDNN 算子库调用的 log |
export MUSA_VISIBLE_DEVICES=0,1,2,3 | Driver | 控制当前可见的显卡序号 |
export MUSA_LAUNCH_BLOCKING=1 | Driver | 驱动以同步模式下发 MUSA kernel,即当前 kernel 执行结束后再下发下一个 kernel |
常用 API 示例代码
torch_musa 中 Python API 基本与
PyTorch 原生 API
接口保持一致,极大降低了新用户的学习成本。
import torch
import torch_musa

torch.musa.is_available()
torch.musa.device_count()

a = torch.tensor([1.2, 2.3], dtype=torch.float32, device='musa')
b = torch.tensor([1.8, 1.2], dtype=torch.float32, device='cpu').to('musa')
c = torch.tensor([1.8, 1.3], dtype=torch.float32).musa()

d = a + b + c

torch.musa.synchronize()

with torch.musa.device(0):
    assert torch.musa.current_device() == 0

if torch.musa.device_count() > 1:
    torch.musa.set_device(1)
    assert torch.musa.current_device() == 1
    torch.musa.synchronize("musa:1")
推理示例代码
import torch
import torch_musa
import torchvision.models as models

model = models.resnet50().eval()
x = torch.rand((1, 3, 224, 224), device="musa")
model = model.to("musa")
# Perform the inference
y = model(x)
训练示例代码
1、常规训练
import torch
import torch_musa
import torchvision
import torchvision.transforms as transforms
import torch.nn as nn
import torch.nn.functional as F
import torch.optim as optim

## 1. prepare dataset

transform = transforms.Compose(
    [transforms.ToTensor(),
    transforms.Normalize((0.5, 0.5, 0.5), (0.5, 0.5, 0.5))])

batch_size = 4
trainset = torchvision.datasets.CIFAR10(root='./data', train=True,
                                        download=True, transform=transform)
trainloader = torch.utils.data.DataLoader(trainset, batch_size=batch_size,
                                        shuffle=True, num_workers=2)
testset = torchvision.datasets.CIFAR10(root='./data', train=False,
                                        download=True, transform=transform)
testloader = torch.utils.data.DataLoader(testset, batch_size=batch_size,
                                        shuffle=False, num_workers=2)
classes = ('plane', 'car', 'bird', 'cat','deer', 'dog', 'frog', 'horse', 'ship', 'truck')
device = torch.device("musa")

## 2. build network

class Net(nn.Module):
    def __init__(self):
        super().__init__()
        self.conv1 = nn.Conv2d(3, 6, 5)
        self.pool = nn.MaxPool2d(2, 2)
        self.conv2 = nn.Conv2d(6, 16, 5)
        self.fc1 = nn.Linear(16 * 5 * 5, 120)
        self.fc2 = nn.Linear(120, 84)
        self.fc3 = nn.Linear(84, 10)
    def forward(self, x):
        x = self.pool(F.relu(self.conv1(x)))
        x = self.pool(F.relu(self.conv2(x)))
        x = torch.flatten(x, 1) # flatten all dimensions except batch
        x = F.relu(self.fc1(x))
        x = F.relu(self.fc2(x))
        x = self.fc3(x)
        return x

net = Net().to(device)

## 3. define loss and optimizer

criterion = nn.CrossEntropyLoss()
optimizer = optim.SGD(net.parameters(), lr=0.001, momentum=0.9)

## 4. train

for epoch in range(2): # loop over the dataset multiple times
    running_loss = 0.0
    for i, data in enumerate(trainloader, 0):
        # get the inputs; data is a list of [inputs, labels]
        inputs, labels = data

        # zero the parameter gradients
        optimizer.zero_grad()

        # forward + backward + optimize
        outputs = net(inputs.to(device))
        loss = criterion(outputs, labels.to(device))
        loss.backward()
        optimizer.step()

        # print statistics
        running_loss += loss.item()
        if i % 2000 == 1999: # print every 2000 mini-batches
            print(f'[{epoch + 1}, {i + 1:5d}] loss: {running_loss / 2000:.3f}')
            running_loss = 0.0

print('Finished Training')

PATH = './cifar_net.pth'
torch.save(net.state_dict(), PATH)

net.load_state_dict(torch.load(PATH))

## 5. test

correct = 0
total = 0
# since we're not training, we don't need to calculate the gradients for our outputs
with torch.no_grad():
    for data in testloader:
        images, labels = data
        # calculate outputs by running images through the network
        outputs = net(images.to(device))
        # the class with the highest energy is what we choose as prediction
        _, predicted = torch.max(outputs.data, 1)
        total += labels.size(0)
        correct += (predicted == labels.to(device)).sum().item()
print(f'Accuracy of the network on the 10000 test images: {100 * correct // total} %')
2、混合精度 AMP 训练示例代码
import torch
import torch_musa
import torch.nn as nn

class SimpleModel(nn.Module):
    def __init__(self):
        super().__init__()
        self.fc1 = nn.Linear(5, 4)
        self.relu = nn.ReLU()
        self.fc2 = nn.Linear(4, 3)
    def forward(self, x):
        x = self.fc1(x)
        x = self.relu(x)
        x = self.fc2(x)
        return x
    def __call__(self, x):
        return self.forward(x)

DEVICE = "musa"

def train_in_amp(low_dtype=torch.float16):
    model = SimpleModel().to(DEVICE)
    criterion = nn.MSELoss()
    optimizer = torch.optim.SGD(model.parameters(), lr=0.1)

    # create the scaler object
    scaler = torch.musa.amp.GradScaler()

    inputs = torch.randn(6, 5).to(DEVICE) # 将数据移至 GPU
    targets = torch.randn(6, 3).to(DEVICE)
    for step in range(20):
        optimizer.zero_grad()
        # create autocast environment
        with torch.musa.amp.autocast(dtype=low_dtype):
            outputs = model(inputs)
            assert outputs.dtype == low_dtype
            loss = criterion(outputs, targets)

        scaler.scale(loss).backward()
        scaler.step(optimizer)
        scaler.update()
    return loss
if __name__ == "__main__":
    train_in_amp(torch.float16)
使能 TensorCore 示例代码
在 M1000 上,当输入数据类型是 float32 时,可以通过设置 TensorFloat32 来使能 TensorCore,从而加速计算过程。TensorFloat32 的加速原理可以参考
TensorFloat-32
。
import torch
import torch_musa
with torch.backends.mudnn.flags(allow_tf32=True):
    assert torch.backends.mudnn.allow_tf32
    a = torch.randn(10240, 10240, dtype=torch.float, device='musa')
    b = torch.randn(10240, 10240, dtype=torch.float, device='musa')
    result_tf32 = a @ b

torch.backends.mudnn.allow_tf32 = True
assert torch_musa._MUSAC._get_allow_tf32()
a = torch.randn(10240, 10240, dtype=torch.float, device='musa')
b = torch.randn(10240, 10240, dtype=torch.float, device='musa')
result_tf32 = a @ b
C++ 部署示例代码
#include <torch/script.h>
#include <torch_musa/csrc/core/Device.h>
#include <cassert>
#include <iostream>
#include <memory>

int main(int argc, const char* argv[]) {
  // Register 'musa' for PrivateUse1 as we save model with 'musa'.
  c10::register_privateuse1_backend("musa");

  torch::jit::script::Module module;
  try {
    // Load model which saved with torch jit.trace or jit.script.
    module = torch::jit::load(argv[1]);
  } catch (const c10::Error& e) {
    std::cerr << "error loading the model\n";
    return -1;
  }

  std::vector<torch::jit::IValue> inputs;
  // Ready for input data.
  torch::Tensor input = torch::rand({1, 3, 224, 224}).to("musa");
  assert(input.is_privateuseone() == input.is_musa());
  assert(input.device().is_privateuseone() == input.device().is_musa());
  inputs.push_back(input);

  // Model execute.
  at::Tensor output = module.forward(inputs).toTensor();

  std::cout << output.slice(/*dim=*/1, /*start=*/0, /*end=*/5) << std::endl;

  return 0;
}
详细用法请参考 examples/cpp 下内容。
端侧推理与编译加速
M1000 具有强大的 GPU 算力,能够高效支持各类 AI 模型的端侧推理任务。PyTorch 提供了多种推理方式。这源于不同部署场景的差异化需求以及 PyTorch 自身的架构演进。本节将详细介绍 eager
mode、torch.compile、AOTI 三种主流的推理模式及其在 torch_musa 中的应用。
m1000_gpu_model_zoo中存放了在 M1000 上基于 torch_musa 推理的热门模型,可帮助开发者快速上手部署。
注意:
并非所有模型都能够通过
torch.compile和aoti部署,具体原因可以通过TORCH_LOGS进行排查。
eager mode (即时执行模式)
Eager
Mode 是 PyTorch 的默认执行模式,采用逐行解释执行的方式,操作在调用时立即执行。这种模式最适合模型开发、调试和原型验证阶段。
基本用法
import torch
import torch_musa
import torchvision.models as models

model = models.resnet18().to("musa").eval()

x = torch.randn(1, 3, 224, 224, device="musa")
with torch.no_grad():
    output = model(x)
    print(output)
torch.compile 模式
PyTorch 2.0 引入了 torch.compile,基于 TorchDynamo + TorchInductor
架构,实现零代码改动即可获得显著加速。TorchDynamo 从 Python 字节码捕获图结构,TorchInductor 将图编译为高效的后端代码。更多信息,可参考
torch.compile 官方文档
基本用法
import torch
import torchvision.models as models

model = models.resnet18().to("musa").eval()
model = torch.compile(model, mode="max-autotune")

dummy_input = torch.randn(1, 3, 224, 224, device="musa")
with torch.no_grad():
    output = model(dummy_input)  # compile the model
    print(output)
相比 eager 模式,只需要增加一行代码,即可增加推理速度。
第一次编译需要花费较多时间,期间可能出现 warning
RuntimeWarning: MUSA backend: num_stages>1 requested without using TME; falling back to num_stages=1.
stages["ttgir"] = lambda src, metadata: self.make_ttgir(src, metadata, options, self.capability, self.warp_size)
这是由于 M1000 缺少 TME 支持,在 triton 算子 tuning 过程中,num_stages > 1 的情况会回退到 num_stages
= 1 。
AOTI (Ahead-Of-Time Inductor)
AOTI 将模型预编译成独立的共享库(.so),实现完全脱离 Python 环境运行,适合生产环境部署和端侧推理场景。更多资料可参考
AOTI 官方文档
方式一:导出为 pt2 格式
编译阶段(Python)
使用 torch.export.export() 将给定的 PyTorch 模型捕获到计算图中。然后
torch._inductor.aoti_compile_and_package()
使用 TorchInductor 编译导出的程序,并将编译后的构件保存到一个包中。该包采用 PT2 Archive
Spec 的格式。
import os
import torch
import torchvision.models as models

model = models.resnet18().to(device="musa").eval()
example_inputs=(torch.randn(1,3,224,224, device="musa"),)

exported = torch.export.export(model, example_inputs)

output_path = torch._inductor.aoti_compile_and_package(
    exported,
    package_path=os.path.join(os.getcwd(), "res18.pt2"),
    inductor_configs={"max_autotune": True,},
)
推理阶段(Python)
在 Python 中提供了一个方便的实用 API torch._inductor.aoti_load_package() 来加载和运行 pt2 文件。
import os
import torch

device = "musa" if torch.musa.is_available() else "cpu"
model = torch._inductor.aoti_load_package(os.path.join(os.getcwd(), "res18.pt2"))
print(model(torch.randn(1, 3, 224, 224, device=device)))
推理阶段(C++)
提供一个 inference.cpp 文件,使开发者能够直接在 C++ 环境中使用 pt2 格式的模型进行推理。
#include <iostream>
#include <vector>

#include <torch/torch.h>
#include <torch/csrc/inductor/aoti_package/model_package_loader.h>
#include <torch_musa/csrc/core/Device.h>
#include <torch_musa/csrc/aten/musa/MUSAContext.h>

int main() {
    // Register 'musa' for PrivateUse1 as we save model with 'musa'.
    c10::register_privateuse1_backend("musa");
    at::musa::lazyInitMUSA();

    torch::inductor::AOTIModelPackageLoader loader("res18.pt2");
    // Assume running on MUSA
    std::vector<torch::Tensor> inputs = {torch::randn({1, 3, 224, 224}).to("musa")};
    std::vector<torch::Tensor> outputs = loader.run(inputs);
    std::cout << "Result from the first inference:"<< std::endl;
    std::cout << outputs[0] << std::endl;

    return 0;
}
对应的 CMakeLists.txt 文件如下,需要在 CMAKE_PREFIX_PATH
变量中增加 torch 和 torch_musa 库的设置文件。
cmake_minimum_required(VERSION 3.18 FATAL_ERROR)
project(aoti_example)

list(APPEND CMAKE_PREFIX_PATH "/home/mt/miniforge3/envs/torch_2.9/lib/python3.10/site-packages/torch/share/cmake")
find_package(Torch REQUIRED)

list(APPEND CMAKE_PREFIX_PATH "/home/mt/miniforge3/envs/torch_2.9/lib/python3.10/site-packages/torch_musa/share/cmake")
find_package(TorchMusa REQUIRED)

add_executable(aoti_example inference.cpp)

if(DEFINED ENV{MUSA_HOME})
    set(MUSA_ROOT "$ENV{MUSA_HOME}")
else()
    set(MUSA_ROOT "/usr/local/musa")
endif()
find_path(MUDNN_CXX_INCLUDE_DIR
    NAMES mudnn.h
    PATHS "${MUSA_ROOT}/include/mudnncxx"
    NO_DEFAULT_PATH
    REQUIRED
)
target_include_directories(aoti_example PRIVATE "${MUDNN_CXX_INCLUDE_DIR}")

target_link_libraries(aoti_example "${TORCH_LIBRARIES}" torch_musa)

set_property(TARGET aoti_example PROPERTY CXX_STANDARD 17)
文件夹结构
aoti_example/
    CMakeLists.txt
    inference.cpp
指令
mkdir build && cd build
cmake ..
cmake --build . --config Release
方式二:导出为 .so 格式
pt2 格式实际是对 TorchInductor 编译获得的 .so、C++ 源码、mubin 算子进行了打包。也可以使用以下接口获取原始导出内容:
torch._inductor.aot_compile()。
编译阶段(Python)
import torch
import torchvision.models as models

model = models.resnet18().to(device="musa").eval()
example_inputs=(torch.randn(1,3,224,224, device="musa"),)

exported = torch.export.export(model, example_inputs)

output_path = torch._inductor.aot_compile(
    exported.module(),
    example_inputs,
    options={"max_autotune": True,},
)

print(f"aot_compile result saved in : {output_path}")
获得 aot_compile 导出的文件路径。
aot_compile result saved in : /tmp/torchinductor_mt/cc3a7dazpfrgeedyqhxjbqxfd2cjkbcmgtq2fdkptltbljikw4bs/c7u6xtpw3lbe6dl2wnyks2vaofkezcbocbmo4amnswwk23234kku.wrapper.so
推理阶段(Python)
将 so_path 换成之前获得的 aot_compile 导出的文件路径。
import torch
from torch_musa._export import aot_load # CUDA: from torch._export import aot_load

so_path = "/tmp/torchinductor_mt/cc3a7dazpfrgeedyqhxjbqxfd2cjkbcmgtq2fdkptltbljikw4bs/c7u6xtpw3lbe6dl2wnyks2vaofkezcbocbmo4amnswwk23234kku.wrapper.so"
device = "musa" if torch.musa.is_available() else "cpu"
model = aot_load(so_path, device)
print(model(torch.randn(8, 10, device=device)))
推理阶段(C++)
提供 so_aot_inference.cpp
文件,用于推理以 .so 格式导出的 AOTI 结果。同样需要将 so_path 换成之前获得的 aot_compile 导出的文件路径。base_dir 为 .so 文件所在的文件夹,用于寻找编译好的 .mubin 算子。
#include <iostream>
#include <vector>

#include <torch/torch.h>
#include <torch_musa/csrc/core/Device.h>
#include <torch_musa/csrc/aten/musa/MUSAContext.h>
#include <torch_musa/csrc/inductor/aoti_runner/model_container_runner_musa.h>

int main() {
    // Register 'musa' for PrivateUse1 as we save model with 'musa'.
    c10::register_privateuse1_backend("musa");
    at::musa::lazyInitMUSA();

    std::string so_path = "/tmp/torchinductor_mt/cc3a7dazpfrgeedyqhxjbqxfd2cjkbcmgtq2fdkptltbljikw4bs/c7u6xtpw3lbe6dl2wnyks2vaofkezcbocbmo4amnswwk23234kku.wrapper.so";
    std::string base_dir = "/tmp/torchinductor_mt/cc3a7dazpfrgeedyqhxjbqxfd2cjkbcmgtq2fdkptltbljikw4bs";

    torch::inductor::AOTIModelContainerRunnerMusa runner(so_path, 1, "musa:0", base_dir);

    // Run inference
    std::vector<torch::Tensor> inputs = {torch::randn({1, 3, 224, 224}).to("musa")};
    std::vector<torch::Tensor> outputs = runner.run(inputs);

    std::cout << "Output shape: " << outputs[0].sizes() << std::endl;
    std::cout << "Output first 10 values: " << outputs[0].flatten().slice(0, 0, 10) << std::endl;

    return 0;
}
对应的 CMakeLists.txt 文件如下,需要在 CMAKE_PREFIX_PATH
变量中增加 torch 和 torch_musa 库的设置文件。
cmake_minimum_required(VERSION 3.10)

project(so_aot_inference LANGUAGES CXX VERSION 1.0.0)

list(APPEND CMAKE_PREFIX_PATH "/home/mt/miniforge3/envs/torch_2.9/lib/python3.10/site-packages/torch/share/cmake")
find_package(Torch REQUIRED)

list(APPEND CMAKE_PREFIX_PATH "/home/mt/miniforge3/envs/torch_2.9/lib/python3.10/site-packages/torch_musa/share/cmake")
find_package(TorchMusa REQUIRED)

add_executable(so_aot_inference so_aot_inference.cpp)

target_link_libraries(so_aot_inference "${TORCH_LIBRARIES}" torch_musa)

set_property(TARGET so_aot_inference PROPERTY CXX_STANDARD 17)
文件夹结构
so_aoti_example/
    CMakeLists.txt
    so_aot_inference.cpp
指令
mkdir build && cd build
cmake ..
cmake --build . --config Release
算子开发
PyTorch 采用定义和实现分离的方式构建算子单元;定义部分包含算子格式、实现方式、后端绑定和导出规则(见 aten/src/ATen/native/native_functions.yaml 文件);对于单个算子,官方为多种设备后端分别实现了计算逻辑。构建时,PyTorch 调用 torchgen 模块解析 yaml 文件,自动生成算子的接口 (*.h)和定义(*.cpp)文件,后者包含了具体实现与后端的绑定,最终在运行时完成注册。
基于 yaml 文件的格式规范,torch_musa 扩展 torchgen 的部分逻辑实现了 codegen 模块;开发者实现 MUSA 算子的计算逻辑后,只需在 torch_musa/csrc/aten/ops/musa_functions.yaml 文件中添加该算子的关键描述,编译时 codegen 模块可自动解析文件内容,生成算子的接口和定义文件,完成与 MUSA 后端的绑定(参考 PyTorch 官方建议,torch_musa 复用 PrivateUse1
key 实现算子注册)。
本节旨在对 PyTorch 的算子实现进行分类,帮助开发者判断是否需要手动适配,选择合适的方式实现算子逻辑,修改 musa_functions.yaml 文件实现绑定注册,完成 MUSA 算子的开发。
注解:
对于单个算子,多后端实现共享相同的接口,在 musa_functions.yaml 文件中该算子的接口定义字段(
func:)只需要列出函数名即可。
注解:
PyTorch 算子的 MUSA 后端 C++ 实现统一位于 at::musa 命名空间下,函数签名和接口定义一致, 禁止默认参数值。
注意:
本节不涉及算子正/反向计算关系的绑定;torch_musa 遵循 PyTorch 自动微分模块的设计与实 现,绑定规则可见 tools/autograd/derivatives.yaml 文件。
算子实现分类
实际上,PyTorch 算子就是 C++ 函数,不同后端提供对应的实现(包含引用第三方代码,比如 MUSA 的.mu 文件),绑定到同一个接口;当接口被调用时,框架根据运行时环境和传入参数,推理出目标后端,然后派发到该后端注册的实现函数完成计算。
由于尺寸变化、类型转换或数据依赖等原因,算子的实现通常会先在内部创建临时变量,计算结果写入 完成后作为结果返回,称为 functional 规则。以 isnan 算子为例, Python 接口为:
torch.isnan(input) -> Tensor
输出是 bool 类型,当输入是 fp32 时,产生类型转换,结果变量只能从内部创建。
当实现逻辑不受上述因素影响时,算子可通过多种规则实现调用,表现为可选的输出参数。以 tril 算子为例,Python 接口为:
torch.tril(input, diagonal=0, *, out=None) -> Tensor
可以看出,输出变量 out 是可配置的,支持外部传入。故产生了下列调用规则:
>>> a = torch.randn(3, 3)
>>> torch.tril(a)
functional 规则(默认),计算结果由实现内部创建并返回。
>>> a = torch.randn(3, 3)
>>> a.tril_()
inplace 规则,输入 a 是可读写的,计算完成后数据被覆盖。
>>> a = torch.randn(3, 3)
>>> b = torch.randn(3, 3)
>>> torch.tril(a, out=b)
out 规则,计算结果写入外部提前创建好的变量 b。
注意,PyTorch 算子区分调用规则。对于 tril 算子,native_functions.yaml 文件中对每种调用规则分别定义了 C++ 函数接口:
Tensor tril(const Tensor&, int64_t); // functional
Tensor& tril_(Tensor&, int64_t); // inplace
Tensor& tril_out(const Tensor&, int64_t, Tensor&); // out
Python 调用对应多种规则的 C++ 算子,称为一个 group
;调用后,在 group 内选择对应的 C++ 算子进行派发。从实现角度看,不同的调用规则除了预处理有区别之外,计算逻辑是一致的。因此,PyTorch 针对 group 算子引入了 structured 的实现方式,整体逻辑拆分为预处理和计算两个子过程,这样的好处是:
-
预处理过程屏蔽调用规则的逻辑差异,对外不区分后端,甚至算子类型。
-
计算过程不区分调用规则,每个后端只需要实现一个计算函数。
-
算子实现的外层逻辑(预处理+ 计算)一致,可由
codegen生成。
structured 的实现方式可以减少代码体积,实现高效的跨规则/跨算子逻辑复用,减少算子实现的工作量。与之相反,只有一种调用规则的算子,对应 unstructured 的实现方式(不存在多种调用规则的逻辑区别),开发者可以尝试复用已有的 structured 子过程,也可以独立实现整个算子逻辑。
是否需要适配算子
以 tril 算子为例,可执行下面的 Python 程序进行验证:
import torch
import torch_musa
input_data = torch.randn(3, 3, device="musa")
result = torch.tril(input_data)
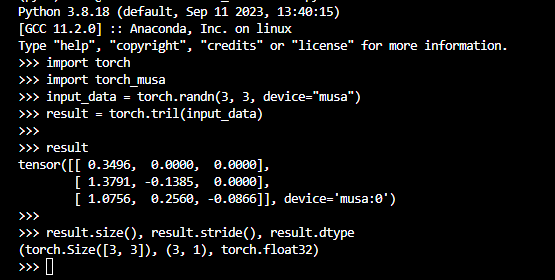
当 torch_musa 内部实现了该算子时,程序正常执行完毕,可以查看 result 的数据和属性:
当测试环境打印如下报错信息:
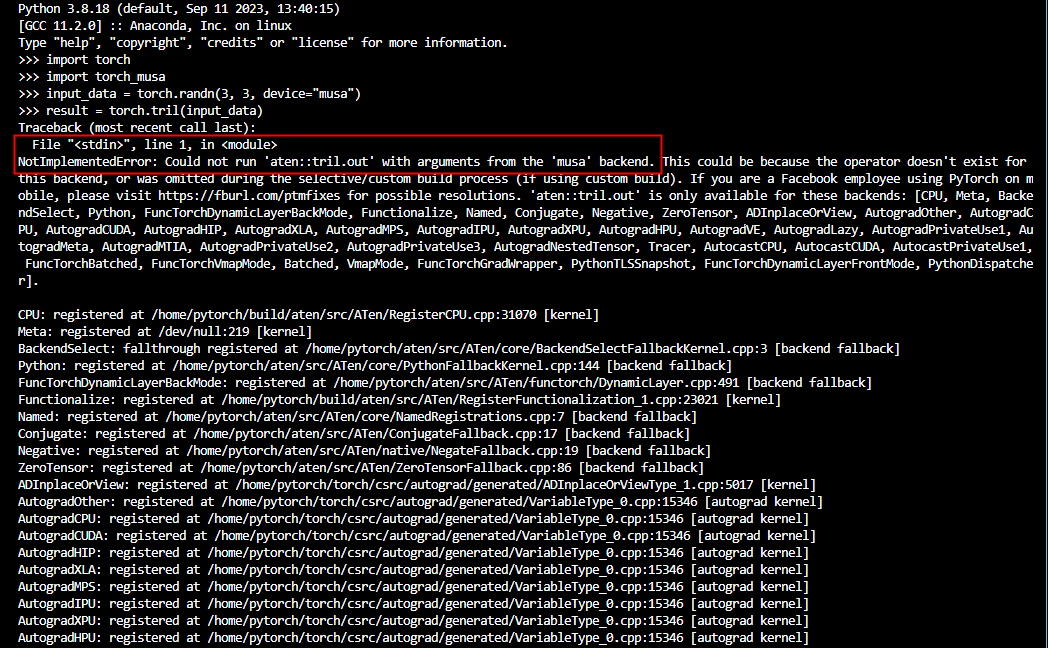
可以确定,MUSA 后端缺少该算子的实现,原因为:
-
尝试调用 functional 规则的算子,即内部创建 result ,计算结果写入后返回,发现该实现缺失。
-
先创建 result,作为 out 参数传入 out 规则的算子调用,发现该实现也缺失。
-
没有其他可调用的算子,报错返回异常。
此时需要手动实现 tril 算子。考虑计算逻辑的完备性,建议把 tril group 内所有调用规则对应的 C++ 算子全都实现。
实现 Structured 算子
对于 structured
group 内多种调用规则的 C++ 算子,PyTorch 使用多级继承的方式实现统一的 预处理 和 计算逻辑,继承类的命名遵循 torchgen 的规则,添加“structured”前缀。以 tril 算子的 CUDA 实现为例,规则如下(由底至上):
-
以 functional 算子名创建 meta::structured_tril 类(简称 meta 类,继承官方的
MetaBase基类),新增 meta 函数实现预处理。 -
以 out 算子绑定的后端实现名创建 native::structured_tril_cuda 类(简称 impl 类,继承 meta 类), 新增 impl 函数实现计算。
-
创建 structured_tril_cuda_functional 类(简称 functional 类,继承 impl 类),覆写基类方法实现结果 tensor 的创建。
-
创建 structured_tril_cuda_inplace 类(简称 inplace 类,继承 impl 类),覆写基类方法实现可读写 tensor 的校验。
-
创建 structured_tril_cuda_out 类(简称 out 类,继承 impl 类),覆写基类方法实现结果 tensor 的校验和尺寸变化。
-
functional/inplace/out 算子实现为分别实例化 3/4/5 中创建的子类,依次调用 meta 和 impl 函数, 最后返回结果。
对于算子实现部分,开发者只需完成 meta 类的预处理和 impl 类的计算逻辑开发,实现对应的函数;为了确保 codegen 正确生成算子文件和注册绑定, native_functions.yaml 文件中对三种调用规则的算子定义添加如下字段:
- 不同调用规则的算子类(上述 3/4/5 中的类)继承同一个 impl 类,视为一种“规约”关系;impl 类 名固定引用 out 算子绑定的后端名,故在 functional/inplace 算子定义中添加“规约”字段,目标为 out 算子名。
- func: tril(Tensor self, int diagonal=0) -> Tensor
  # 参考 out 算子的内容,生成 functional 类
  # 标记该算子为 structured 的实现方式
  structured_delegate: tril.out

- func: tril_(Tensor(a!) self, int diagonal=0) -> Tensor(a!)
  # 参考 out 算子的内容,生成 inplace 类
  # 标记该算子为 structured 的实现方式
  structured_delegate: tril.out
- out 算子声明除了后端名外,需要增加
structured实现方式的标记,支持扩展字段描述基类信息,以 及传递预处理的中间变量映射关系。
- func: tril.out(Tensor self, int diagonal=0, *, Tensor(a!) out) -> Tensor(a!)
  structured: True # 标记该算子为 structured 的实现方式
  dispatch:
    CUDA: tril_cuda # out 类和 impl 类实现的命名参考
# 选择要继承的基类,缺省默认为 MetaBase,自定义例如
# structured_inherits: TensorIteratorBase
# 预处理传递给计算函数的中间变量映射关系,缺省默认为原参数传递,自定义例如
# precomputed:
# - diagonal -> int var
导入上述定义字段后,构建时 torchgen 自动解析字段内容,生成上述 1-6 中所有的类定义和算子实现 (调用 meta 和 impl 函数),生成绑定和注册代码,完成算子的适配。
基于上述规范,在实现 structured 的 MUSA 算子时,考虑到 PyTorch 已经集成了 CUDA 的实现, meta/impl 函数可能都可以复用,故有三种实现方法。
复用 meta/impl 函数(Legacy)
这类算子的 meta 预处理逻辑是通用的,impl 函数内部应用了 PyTorch 的 DispatchStub 机制,即 CPU/CUDA 后端分别把计算 kernel 注册到算子对应的 stub 中,运行时根据目标 device 在 stub 中找到对应的 kernel 完成计算。可直接复用 CUDA 的 impl 实现,只需要实现 MUSA
kernel,并注册到对应的 stub 中即可。
注解:
DispatchStub 的原理可参考
pytorch/aten/src/ATen/native/DispatchStub.h
源码文件
由于 MUSA 的编程模型实现了 CUDA 兼容,MUSA
kernel 的一种实现方法是通过 CUDA-Porting 工具完成,主要流程如下:
-
新建目录 build/generated_cuda_compatible,保存
Porting的 kernels 文件和依赖头文件。 -
把
PyTorch仓库中的CUDAkernels 和安装目录中的头文件复制到新建目录内(维持相对路径)。 -
Porting工具实施文本替换,如将cudaMalloc替换成musaMalloc,cuda_fp16.h替换成musa_fp16.h等。
上述步骤在编译时依次执行,结束后指定目录下出现目标 mu 文件,包含转换完成的 MUSA
kernel 和 stub 注册实现,将该文件添加到 musa_kernels 库包含的源文件集合中即可。以 lerp 算子为例,目标文件为 Lerp.mu,包含如下内容:
// 文件位置:build/generated_cuda_compatible/aten/src/ATen/native/musa/Lerp.mu

// lerp.Tensor group MUSA kernel
void lerp_tensor_kernel(at::TensorIteratorBase& iter) {......}

// lerp.Scalar group MUSA kernel
void lerp_scalar_kernel(at::TensorIteratorBase& iter, const c10::Scalar& weight) {
......
}

// lerp.Tensor group stub 注册
REGISTER_DISPATCH(lerp_kernel_tensor_weight, &lerp_tensor_kernel);
// lerp.Scalar group stub 注册
REGISTER_DISPATCH(lerp_kernel_scalar_weight, &lerp_scalar_kernel);
文件中已经包含计算和注册代码,需要在编译文件中做如下修改:
# 文件位置:/home/torch_musa/torch_musa/csrc/CMakeLists.txt

file(
GLOB_RECURSE
MU_SRCS
......
${GENERATED_PORTING_DIR}/aten/src/ATen/native/musa/Lerp.mu
......
)
编译完成后 musa_kernels 动态库中会包含 MUSA lerp 的 kernels,在运行时自动注册到 lerp
stub 中。 由于 MUSA 和 CUDA 设备的参数和架构存在差异,有时通过 CUDA-Porting 生成的 MUSA
kernels 在运行时会报错或者效率不高,此时开发者可以选择手动修改或重写计算逻辑,即放弃在编译文件中加入 Porting 生成的 Lerp.mu 文件,在 torch_musa/csrc/aten/ops/musa 目录下创建 Lerp.mu 文件,手动实现 lerp
kernels 和 stub 注册。
对于这种 Legacy 的实现方式,musa_functions.yaml 中算子的定义只需要列出算子名,其他的 structured 关键字 codegen 模块自动与 PyTorch 保持对齐。以 Lerp 算子为例,内容如下:
- func: lerp.Scalar_out
- func: lerp.Scalar
- func: lerp_.Scalar

- func: lerp.Tensor_out
- func: lerp.Tensor
- func: lerp_.Tensor
只复用 meta 函数(LegacyMeta)
当算子的预处理逻辑通用,计算逻辑不使用 DispatchStub 时,开发者需要显式实现 MUSA 后端的 impl 函数。以 tril 算子为例,首先在 musa_functions.yaml 文件中添加算子接口定义:
- func: tril
- func: tril_
- func: tril.out
  dispatch:
    PrivateUse1: MusaTril
functional/inplace 规则的算子“规约”方式保持一致,列出算子名即可;与 Legacy 方式不同,out 算子需要显式指定后端实现名,让 codegen 模块自动生成 impl 类(在 at::musa 命名空间下)。实现计算逻辑时,可在 torch_musa/csrc/aten/ops 目录下新建 Tril.cpp 文件,实现如下函数:
// 文件位置:torch_musa/csrc/aten/ops/Tril.cpp
namespace at::musa {

TORCH_IMPL_FUNC(MusaTril)(const Tensor& self, int64_t k, const Tensor &result) { // 计算过程
}} // namespace at::musa
PyTorch 针对 structured 类和函数定义了一系列宏,此处 TORCH_IMPL_FUNC(MusaTril) 会自动展开为 void
structured_MusaTril::impl,与 codegen 生成的 impl 类函数保持一致。LegacyMeta 的实现方式不用修改编译文件,Tril.cpp 会自动被加入到 musa_kernels 库的源文件集合中。
自定义 meta/impl 函数(Customized)
如果在实现 MUSA structured 算子时遇到如下情况:
-
预处理逻辑和 CPU/
CUDA有区别。 -
meta 类需要继承不同的基类。
-
meta 函数需要传给 impl 函数自定义的中间值,与 CPU/
CUDA不同或 CPU/CUDA不传中间值。
开发者需要同时显式实现 meta 和 impl 函数(都在 at::musa 命名空间下)。以 tril 算子为例,首先在 musa_functions.yaml 文件中添加算子接口定义:
- func: tril
- func: tril_
- func: tril.out
  structured_inherits: MyMetaBase # 集成的基类名
  precomputed:
    - diagonal -> int var # 需要传递的中间变量
  dispatch:
    PrivateUse1: MusaTril
out 算子定义中必须显式指定 structured_inherits(情况 2)或者 precomputed(情况 3)字段。考虑情况 2,meta 类的定义如下:
namespace at::musa {

struct TORCH_API structured_tril : public at::musa::MyMetaBase { void meta(const at::Tensor & self, int64_t diagonal);};} // namespace at::musa
meta 类的名字和 CPU/CUDA 一样,依靠命名空间实现隔离。需要额外满足情况 3 时,meta 类定义为:
namespace at::musa {

struct TORCH_API structured_tril : public at::musa::MyMetaBase { template <bool VAR = false> struct TORCH_API precompute_out { precompute_out<true> set_var(int64_t value) { static_assert(VAR == false, "var already set"); precompute_out<true> ret; ret.var = value; return ret; } int64_t var; }; using meta_return_ty = precompute_out<true>; meta_return_ty meta(const at::Tensor & self, int64_t diagonal);};} // namespace at::musa
codegen 模块会在 meta 类中生成一个嵌套模板子类 precompute_out,meta 函数返回值由 void 变为该子类的实例化,存储产生的中间变量。 impl 函数的 diagonal 参数由 var 代替,而非算子调用时传入的值。因此 impl 类定义为:
namespace at::musa {

struct TORCH_API structured_MusaTril : public at::musa::structured_tril { void impl(const at::Tensor & self, int64_t var, const at::Tensor & out);};} // namespace at::musa
开发者在实现 Customized 形式的 meta/impl 函数时需要注意函数签名和 codegen 生成的接口声明保 持一致。以 Tril.cpp 为目标文件,计算逻辑可实现如下:
// 文件位置:torch_musa/csrc/aten/ops/Tril.cpp
namespace at::musa {

TORCH_PRECOMPUTE_META_FUNC(tril)(const Tensor& self, int64_t diagonal) { // 参数校验
// 计算临时变量
int64_t var = .... // 打包临时变量
return TORCH_PRECOMPUTE_META_FUNC(tril).set_var(var);}

TORCH_IMPL_FUNC(MusaTril)(const Tensor& self, int64_t var, const Tensor &result) { // 计算实现
}} // namespace at::musa
计算函数的第二个参数是中间变量 var,非算子调用时传入的原始参数 diagonal,剩下的实现过程与 LegacyMeta 方式类似。
总结来看,MUSA structured 算子的开发难度为 Legacy < LegacyMeta <
Customized。当 impl 函数使用了 DispatchStub 机制时,可以通过 Porting-CUDA 快速实现基础 MUSA
kernels;遇到正确性或效率问题时,可结合 MUSA 设备的架构参数,自定义 impl 函数优化计算逻辑;如果要实现全新的预处理策略,再考虑自定义 meta 函数,普通情况下一般不会用到。
实现 UnStructured 算子
PyTorch 的 unstructured 算子一般以 functional 规则调用,实现逻辑相互独立,不显式抽象出预处理和计算子逻辑,而是在实现内部自组织。算子定义时,需要显式指定 MUSA 后端的派发名,和 structured 算子不同,这个名字就是实现绑定的函数名。以 nonzero 算子为例,参考 CPU/CUDA 声明格式, MUSA 后端可声明如下:
# CPU/CUDA 声明,来自 native_functions.yaml
# structured 默认为 false,标记为 unstructured 实现方式
- func: nonzero(Tensor self) -> Tensor
  dispatch:
    CPU: nonzero_cpu
    CUDA: nonzero_cuda

# MUSA 声明,来自 musa_functions.yaml
# structured 缺省,默认和官方保持一致
- func: nonzero
  dispatch:
    PrivateUse1: Nonzero
算子声明可以显式指定 structured 为 false。由于官方实现方式默认是 unstructured,该字段也可以忽略不写,codegen 模块会自动对齐 CPU/CUDA 的设置。考虑灵活扩展,torch_musa 也支持将官方 structured 实现转换为 MUSA 后端的 unstructured 实现,以 add.Tensor 算子为例(Tensor +
Tensor),MUSA 的 unstructured 声明如下:
# Unstructured 声明,来自 musa_functions.yaml
- func: add.Tensor
  dispatch:
    PrivateUse1: AddTensor
- func: add_.Tensor
  dispatch:
    PrivateUse1: AddTensor_
- func: add.out
  structured: false
  dispatch:
    PrivateUse1: AddTensorOut
如果算子的原始 structured 声明包含下列属性,在 MUSA 声明中需要显式处理:
-
structured:out 声明用 false 值覆盖,functional/inplace 声明缺省。 -
structured_delegate:functional/inplace 声明用 none 覆盖,out 声明缺省。 -
structured_inherits:out 声明用 none 值覆盖,functional/inplace 声明缺省。 -
precomputed:out 声明用 none 值覆盖,functional/inplace 声明缺省。 -
dispatch:所有规则声明都需要显式指定派发的后端名。
正确设置上述属性后,codegen 模块把 group 内每个调用规则的算子看成是实现独立的,生成注册函数时内部直接调用 MUSA 后端绑定名对应的实现函数,否则解析 yaml 文件会报错。在算子实现部分,可根据实际情况选择合适的逻辑策略。
复用公共函数(Legacy)
当算子的实现逻辑完全不区分后端时,CPU/CUDA 的实现会共用 PyTorch 仓库提供的一个基础函 数,内部逻辑可能只涉及非数据计算的视图转换,或者数据计算完全由依次调用其他算子完成。以 view_as_real 算子为例,实现逻辑只是复数拆开成两个浮点数的视图转换,没有数据计算,原始的官方 声明如下:
- func: view_as_real(Tensor(a) self) -> Tensor(a)
  dispatch:
    CPU, CUDA, MPS, Meta: view_as_real
可以看出 CPU/CUDA 等后端绑定了一个公共的 view_as_real 函数实现转换; MUSA 后端实现应该保持 一致,避免冗余代码,表现在算子声明上:
- func: view_as_real
  dispatch:
    PrivateUse1: view_as_real
在编译时, codegen 模块会在 unstructured 实现方式的前提下对比函数名,判断出 MUSA 的绑定函数和 CPU/CUDA 一样,注册函数内部自动调用对应的公共函数,也称为 Legacy 实现。
接入 MUDNN(Customized)
如果算子的 MUSA 实现涉及数据计算,且 MUDNN 库提供了相应能力,可在实现逻辑内部直接调用 MUDNN 接口完成计算。使用 MUDNN 库的主要步骤如下:
-
参数校验,主要检查 device/dtype/defined_tensor 等。
-
添加 DeviceGuard。
-
参数转换,比如 conv 算子只支持连续 tensors,需要提前把输入/输出 tensors 转换为连续的。
-
创建输入/输出 MUTensors,以及
MUDNN的计算实例,配置计算参数。 -
调用实例接口完成计算,返回计算结果。
以 add.Tensor 的 functional 算子为例,可在 torch_musa/csrc/aten/ops 目录下创建 Add.cpp 文件,实现 AddTensor 函数:
#include <mudnn.h>

Tensor AddTensor(
const Tensor& self, const Tensor& other, Scalar const& alpha_scalar) {
// 检查 device
TORCH_CHECK(self.device().type() == kMUSA, "......");
TORCH_CHECK(self.device().type() == other.device().type(), "......");

// 检查 dtype
TORCH_CHECK(
self.scalar_type() == at::ScalarType::Float, "......");

......

// 添加 DeviceGuard
const c10::musa::MUSAGuard guard(self.device());

// 连续性转换
auto self_contig = self.contiguous();
auto other_contig = at::mul(other, alpha_scalar);
other_contig = other_contig.contiguous();

// 创建输出
auto output = at::empty(
infer_size_dimvector(self.sizes(), other.sizes()),
self.options());

// 创建 MUTensors
muTensor lhs = CreateMUTensor(self_contig);
muTensor rhs = CreateMUTensor(other_contig);
muTensor out = CreateMUTensor(output);

// 调用 MUDNN 接口
auto& h = GetMudnnHandle();
::musa::dnn::Binary op;
CHECK_MUDNN_STATUS(op.SetMode(::musa::dnn::Binary::Mode::ADD), "SetMode");
CHECK_MUDNN_STATUS(op.Run(h, out, lhs, rhs), "Run Add.Tensor");

return output;
}
通过 mudnn*.h 头文件可以查询 MUDNN 库的算子支持情况和接口定义,默认地址为 /usr/local/musa/include 目录。如果 MUDNN 不支持,也可以通过 CUDA-Porting 等方式手动实现 MUSA
kernels,在函数内部手工调用完成计算。
CPU 计算(Customized)
对于部分算子,如果 MUDNN 不支持,CUDA-Porting 也无法支持,可以临时中转到 CPU 后端实现该算子。主要逻辑是,先把 tensor 拷贝到 CPU 上,调用 CPU 算子完成计算,再将结果拷贝回 GPU。可以参考下述代码:
Tensor AddTensor(
   const Tensor& self, const Tensor& other, Scalar const& alpha_scalar) {
   const auto cpu_dev = DeviceType::CPU;
   const auto musa_dev = self.device();
   auto cpu_self = at::empty(self.sizes(), self.options().device(cpu_dev));
   auto cpu_other = at::empty(other.sizes(), other.options().device(cpu_dev));
   return at::cpu::add(cpu_self, cpu_other).to(musa_dev);
}
在初次适配模型时,可以通过这种方式快速判断缺少哪些算子,然后再逐个适配,通过接入 MUDNN 或 自定义 kernels 的方式提高性能。
注意:
除了 MUSA 后端(PrivateUse1)外,其他 MUSA 相关后端(比如 QuantizedPrivateUse1)的实现方式一定是 unstructured 的。
注解:
以上代码仅作参考,不代表实际的实现逻辑。
第三方库 MUSA 扩展支持
本节主要介绍如何对 PyTorch 生态的第三方库进行 MUSA 扩展的构建(MUSAExtension),对应于 CUDAExtension。
为什么要对第三方库进行 MUSA 扩展的构建
以 mmcv 库(commit
id 为 0a2f60ba0198f8d567b536313bfba329588f9c3f) 为例,当测试代码出现如下报错 log 时,说明 mmcv 中没有构建 MUSA 扩展。此时需要对 mmcv 库进行 MUSA 扩展,使 mmcv 库运行在摩尔线程显卡上。
import numpy as np
import torch
import torch_musa
from mmcv.ops import nms
np_boxes = np.array([[6.0, 3.0, 8.0, 7.0], [3.0, 6.0, 9.0, 11.0],
[3.0, 7.0, 10.0, 12.0], [1.0, 4.0, 13.0, 7.0]],
dtype=np.float32)
np_scores = np.array([0.6, 0.9, 0.7, 0.2], dtype=np.float32)
np_inds = np.array([1, 0, 3])
np_dets = np.array([[3.0, 6.0, 9.0, 11.0, 0.9],
[6.0, 3.0, 8.0, 7.0, 0.6],
[1.0, 4.0, 13.0, 7.0, 0.2]])
boxes = torch.from_numpy(np_boxes)
scores = torch.from_numpy(np_scores)
# check if cpu can work
dets, inds = nms(boxes, scores, iou_threshold=0.3, offset=0)
# check if musa can work
dets, inds = nms(boxes.musa(), scores.musa(), iou_threshold=0.3, offset=0)
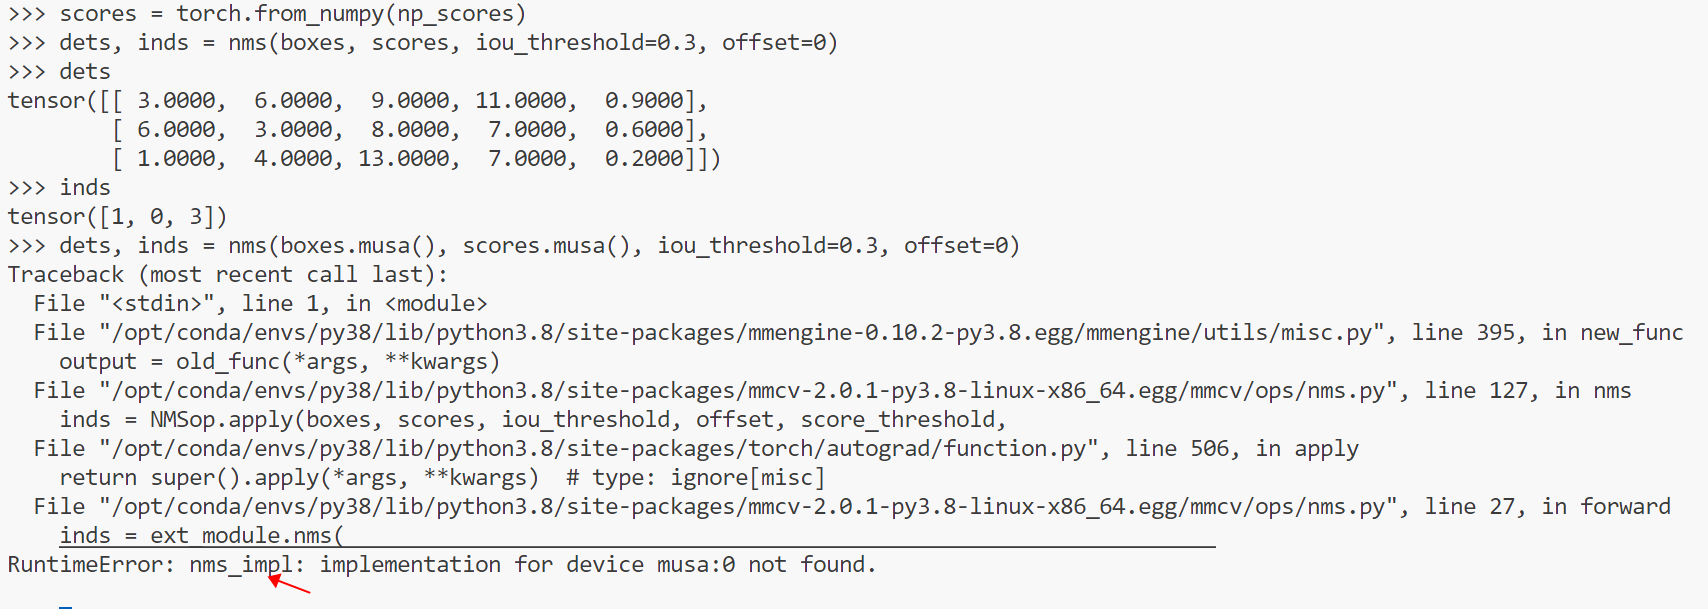
注意以上测试不要在 mmcv 根目录下进行,以免将当前目录下的 mmcv 包导入。
如何对第三方库进行 MUSA 扩展
了解 MUSAExtension 这个 API
阅读 torch_musa/utils/README.md 中关于 MUSAExtension 的介绍。
CUDA-Porting
首先需要找到 mmcv 中与 CUDA 相关的文件位置,主要包括:
-
mmcv/mmcv/ops/csrc/common/cuda/ -
mmcv/mmcv/ops/csrc/pytorch/cuda/
可对 mmcv/mmcv/ops/csrc 目录进行 CUDA-Porting,生成 mmcv/mmcv/ops/csrc_musa 目录。
为减少不必要的 Porting,可忽略如下目录:
-
mmcv/ops/csrc/common/mlu
-
mmcv/ops/csrc/common/mps
-
mmcv/mmcv/ops/csrc/parrots
-
mmcv/mmcv/ops/csrc/pytorch/mlu
-
mmcv/mmcv/ops/csrc/pytorch/mps
-
mmcv/mmcv/ops/csrc/pytorch/
npu
之后从 mmcv 根目录全局搜索 cu、nv、cuda 和对应的大写关键词。搜索关键词的目的在于梳理自定义 的映射规则,本次对搜索结果的映射规则提取如下:
-
1:
_CU_H_->_MU_H_ -
2:
_CUH->_MUH -
3:
__NVCC__->__MUSACC__ -
4:
MMCV_WITH_CUDA->MMCV_WITH_MUSA -
5:
AT_DISPATCH_FLOATING_TYPES_AND_HALF->AT_DISPATCH_FLOATING_TYPES -
6:
#include <ATen/cuda/CUDAContext.h>->#include "torch_musa/csrc/aten/musa/MUSAContext.h" -
7:
#include <c10/cuda/CUDAGuard.h>->#include "torch_musa/csrc/core/MUSAGuard.h" -
8:
::cuda::->::musa:: -
9:
/cuda/->/musa/ -
10:
, CUDA,->, PrivateUse1, -
11:
.cuh->.muh -
12:
.is_cuda()->.is_privateuseone()
大多数情况下,基本映射规则为 cu -> mu、nv -> mt、cuda -> musa、cuh -> muh 及对应的大写映射。如果在编译过程中遇到 HALF 相关的编译报错,可以如上所示将 HALF 相关的宏取消掉。随后将搜索出的关键词扩展为单词边界后再进行映射;如果直接执行 cu -> mu,会产生 Accumulate -> Acmumulate 这类非预期结果。第 3、6、7、10、12 个规则是固定转换,其中 PrivateUse1 是 PyTorch 中扩展自定义 backend 的默认名称,is_privateuseone 也是自定义 backend 相关 API。
根据上述分析,可得到如下 CUDA-porting 脚本:
SimplePorting(cuda_dir_path="./mmcv/ops/csrc", ignore_dir_paths=[
            "./mmcv/ops/csrc/common/mlu",
            "./mmcv/ops/csrc/common/mps",
            "./mmcv/ops/csrc/parrots",
            "./mmcv/ops/csrc/pytorch/mlu",
            "./mmcv/ops/csrc/pytorch/mps",
            "./mmcv/ops/csrc/pytorch/npu"
            ],
            mapping_rule={
            "_CU_H_": "_MU_H_",
            "_CUH": "_MUH",
            "__NVCC__": "__MUSACC__",
            "MMCV_WITH_CUDA": "MMCV_WITH_MUSA",
            "AT_DISPATCH_FLOATING_TYPES_AND_HALF": "AT_DISPATCH_FLOATING_TYPES",
            "#include <ATen/cuda/CUDAContext.h>": "#include \"torch_musa/csrc/aten/musa/MUSAContext.h\"",
            "#include <c10/cuda/CUDAGuard.h>": "#include \"torch_musa/csrc/core/MUSAGuard.h\"",
            "::cuda::": "::musa::",
            "/cuda/": "/musa/",
            ", CUDA,": ", PrivateUse1,",
            ".cuh": ".muh",
            ".is_cuda()": ".is_privateuseone()",
            }
            ).run()
需要注意的是,虽然已自定义映射规则,但没有传入 drop_default_mapping 参数,因此 CUDA-Porting 时仍会使用默认映射规则,见 torch_musa/utils/mapping 文件夹。由于该文件夹下的 general.json 条目较多,并且基本不会被用到,所以默认映射规则只包含 general.json 之外的其他映射规则(mapping 文件夹中除 general.json 之外的其他 JSON 文件),general.json 可作为自定义映射规则的参考。如果不想在代码中添加映射规则,也可以在 extra.json 文件中添加条目或者自行添加新的 JSON 文件。
分析 mmcv 的构建脚本 setup.py
...
elif is_rocm_pytorch or torch.cuda.is_available() or os.getenv('FORCE_CUDA', '0') == '1':
if is_rocm_pytorch:
   define_macros += [('MMCV_WITH_HIP', None)]
define_macros += [('MMCV_WITH_CUDA', None)]
cuda_args = os.getenv('MMCV_CUDA_ARGS')
extra_compile_args['nvcc'] = [cuda_args] if cuda_args else []
op_files = glob.glob('./mmcv/ops/csrc/pytorch/*.cpp') + \
   glob.glob('./mmcv/ops/csrc/pytorch/cpu/*.cpp') + \
   glob.glob('./mmcv/ops/csrc/pytorch/cuda/*.cu') + \
   glob.glob('./mmcv/ops/csrc/pytorch/cuda/*.cpp')
extension = CUDAExtension
include_dirs.append(os.path.abspath('./mmcv/ops/csrc/pytorch'))
include_dirs.append(os.path.abspath('./mmcv/ops/csrc/common'))
include_dirs.append(os.path.abspath('./mmcv/ops/csrc/common/cuda'))
elif(hasattr(torch, 'is_mlu_available') and
...
在 CUDA 扩展的构建逻辑中,环境变量 FORCE_CUDA 用于控制是否构建,同时存在 CUDA 相关宏定义 MMCV_WITH_CUDA,extension 赋值为 CUDAExtension,并配置源文件和头文件。因此可以增加一个 elif 分支,利用环境变量 FORCE_MUSA 控制是否构建,并添加宏定义 MMCV_WITH_MUSA。对 mmcv/mmcv/ops/csrc 目录进行 CUDA-porting 后,会生成 mmcv/mmcv/ops/csrc_musa,设置源文件和头文件路径时只需将 csrc 改为 csrc_musa,最后将 extension 赋值为 MUSAExtension。同时还需要将 cmd_class 中的 build_ext 设置为 musa 的 BuildExtension,并设置 MUSA_ARCH 宏和 MUSA_ARCH 环境变量。增加的分支如下所示:
...
elif os.getenv('FORCE_MUSA', '0') == '1':
   from torch_musa.utils.simple_porting import SimplePorting
   from torch_musa.utils.musa_extension import MUSAExtension
   SimplePorting(cuda_dir_path="./mmcv/ops/csrc", ignore_dir_paths=[
   "./mmcv/ops/csrc/common/mlu",
   "./mmcv/ops/csrc/common/mps",
   "./mmcv/ops/csrc/parrots",
   "./mmcv/ops/csrc/pytorch/mlu",
   "./mmcv/ops/csrc/pytorch/mps",
   "./mmcv/ops/csrc/pytorch/npu"
   ],
   mapping_rule={
      "_CU_H_": "_MU_H_",
      "_CUH": "_MUH",
      "__NVCC__": "__MUSACC__",
      "MMCV_WITH_CUDA": "MMCV_WITH_MUSA",
      "AT_DISPATCH_FLOATING_TYPES_AND_HALF": "AT_DISPATCH_FLOATING_TYPES",
      "#include <ATen/cuda/CUDAContext.h>": "#include \"torch_musa/csrc/aten/musa/MUSAContext.h\"",
      "#include <c10/cuda/CUDAGuard.h>": "#include \"torch_musa/csrc/core/MUSAGuard.h\"",
      "::cuda::": "::musa::",
      "/cuda/": "/musa/",
      ", CUDA,": ", PrivateUse1,",
      ".cuh": ".muh",
      ".is_cuda()": ".is_privateuseone()",
      }
      ).run()
   op_files = glob.glob('./mmcv/ops/csrc_musa/pytorch/*.cpp') + \
      glob.glob('./mmcv/ops/csrc_musa/pytorch/cpu/*.cpp') + \
      glob.glob('./mmcv/ops/csrc_musa/pytorch/cuda/*.mu') + \
      glob.glob('./mmcv/ops/csrc_musa/pytorch/cuda/*.cpp')
   from torch_musa.testing import get_musa_arch
   define_macros += [('MMCV_WITH_MUSA', None),
                  ('MUSA_ARCH', str(get_musa_arch()))]
   os.environ['MUSA_ARCH'] = str(get_musa_arch())

   extension = MUSAExtension
   include_dirs.append(os.path.abspath('./mmcv/ops/csrc_musa/pytorch'))
   include_dirs.append(os.path.abspath('./mmcv/ops/csrc_musa/common'))
   include_dirs.append(os.path.abspath('./mmcv/ops/csrc_musa/common/cuda'))
   from torch_musa.utils.musa_extension import MUSAExtension,BuildExtension
   cmd_class = {'build_ext': BuildExtension}
elif (hasattr(torch, 'is_mlu_available') and
...
构建并测试
由于本次实验是在 MTT
S3000 上进行,mmcv 中涉及到 fp64 的使用,因此需要打开该选项。额外环境变量可参考 torch_musa 根目录下的 CMakeLists.txt 和 build.sh。
执行以下命令构建 mmcv 并记录构建日志。第一次构建时可能遇到编译错误,其中一个示例如下图所示:
ENABLE_COMPILE_FP64=1 FORCE_MUSA=1 python setup.py install > build.log
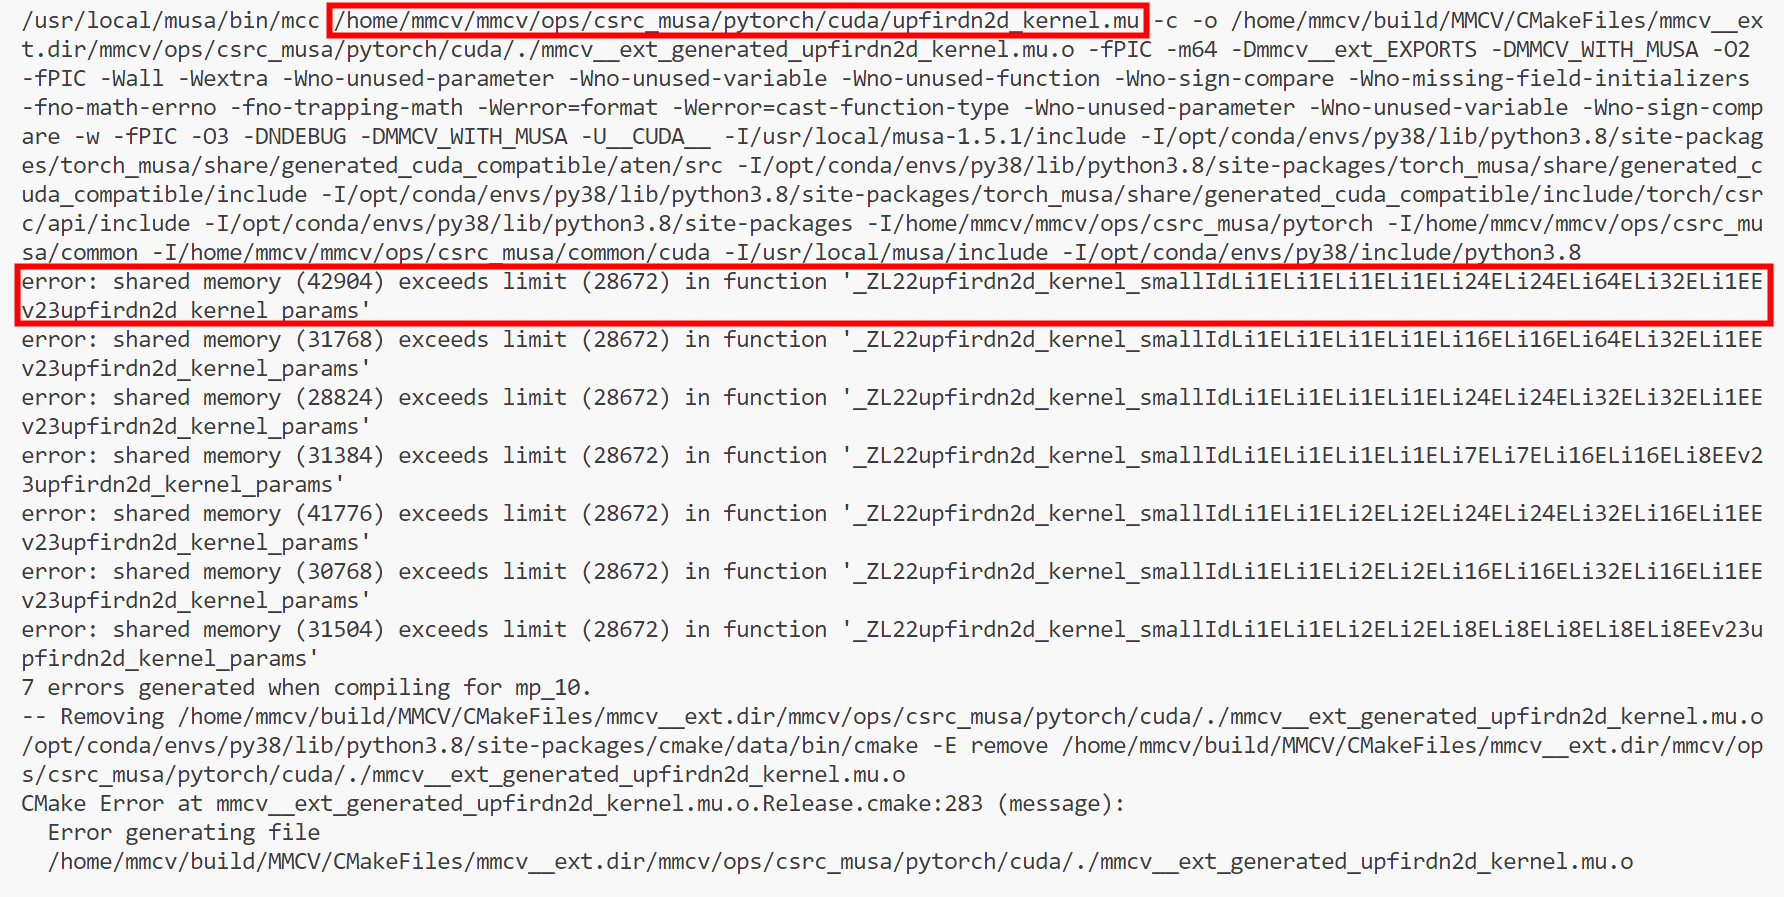
这是由于定义的结构体(upfirdn2d_kernel_params)要使用的 shared
memory 过大,超过了硬件(此次编译是在 MTT
S3000 上进行的)规格限制,因此可避免构建该 kernel 的 musa 扩展(mmcv/mmcv/ops/csrc_musa/pytorch/cuda/upfirdn2d_kernel.mu)。如果模型中没有真实用到该 kernel,可以将其注释,临时绕过该算子,保证模型正常运行。如果模型确认需要使用该 kernel,请联系摩尔线程 AI 研发中心反馈该问题(在外网提 issue),后续会及时修复。其他编译错误也可以按类似方式处理。
对 mmcv 进行 MUSA 适配需要修改如下文件:
-
MANIFEST.in
-
mmcv/ops/csrc/common/cuda/carafe_cuda_kernel.cuh -
mmcv/ops/csrc/common/cuda/chamfer_distance_cuda_kernel.cuh -
mmcv/ops/csrc/common/cuda/scatter_points_cuda_kernel.cuh -
mmcv/ops/csrc/pytorch/cuda/upfirdn2d_kernel.cu -
setup.py
再次测试本节开头的例子,结果如下:
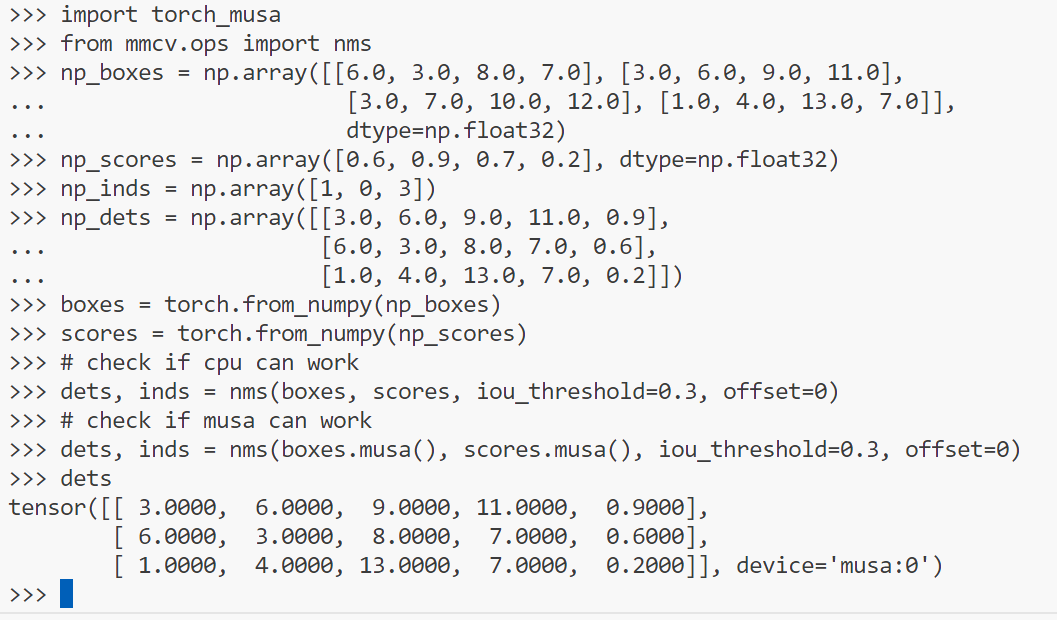
上述结果不能完整证明 mmcv 适配功能的完备性,可对 mmcv 自带单元测试进行简单改动后继续测试。例如 tests/test_ops/test_box_iou_quadri.py:
# Copyright (c) OpenMMLab. All rights reserved.
import numpy as np
import pytest
import torch
import torch_musa

# from mmcv.utils import IS_CUDA_AVAILABLE


class TestBoxIoUQuadri:

@pytest.mark.parametrize('device', [
'cpu',
pytest.param(
'musa',
marks=pytest.mark.skipif(
not True, reason='requires MUSA support')),
])
def test_box_iou_quadri_musa(self, device):
from mmcv.ops import box_iou_quadri
np_boxes1 = np.asarray([[1.0, 1.0, 3.0, 4.0, 4.0, 4.0, 4.0, 1.0],
[2.0, 2.0, 3.0, 4.0, 4.0, 2.0, 3.0, 1.0],
[7.0, 7.0, 8.0, 8.0, 9.0, 7.0, 8.0, 6.0]],
dtype=np.float32)
np_boxes2 = np.asarray([[0.0, 0.0, 0.0, 2.0, 2.0, 2.0, 2.0, 0.0],
[2.0, 1.0, 2.0, 4.0, 4.0, 4.0, 4.0, 1.0],
[7.0, 6.0, 7.0, 8.0, 9.0, 8.0, 9.0, 6.0]],
dtype=np.float32)
np_expect_ious = np.asarray(
[[0.0714, 1.0000, 0.0000], [0.0000, 0.5000, 0.0000],
[0.0000, 0.0000, 0.5000]],
dtype=np.float32)
np_expect_ious_aligned = np.asarray([0.0714, 0.5000, 0.5000],
dtype=np.float32)

boxes1 = torch.from_numpy(np_boxes1).to(device)
boxes2 = torch.from_numpy(np_boxes2).to(device)

ious = box_iou_quadri(boxes1, boxes2)
assert np.allclose(ious.cpu().numpy(), np_expect_ious, atol=1e-4)

ious = box_iou_quadri(boxes1, boxes2, aligned=True)
assert np.allclose(
ious.cpu().numpy(), np_expect_ious_aligned, atol=1e-4)

@pytest.mark.parametrize('device', [
'cpu',
pytest.param(
'musa',
marks=pytest.mark.skipif(
not True, reason='requires MUSA support')),
])
def test_box_iou_quadri_iof_musa(self, device):
from mmcv.ops import box_iou_quadri
np_boxes1 = np.asarray([[1.0, 1.0, 3.0, 4.0, 4.0, 4.0, 4.0, 1.0],
[2.0, 2.0, 3.0, 4.0, 4.0, 2.0, 3.0, 1.0],
[7.0, 7.0, 8.0, 8.0, 9.0, 7.0, 8.0, 6.0]],
dtype=np.float32)
np_boxes2 = np.asarray([[0.0, 0.0, 0.0, 2.0, 2.0, 2.0, 2.0, 0.0],
[2.0, 1.0, 2.0, 4.0, 4.0, 4.0, 4.0, 1.0],
[7.0, 6.0, 7.0, 8.0, 9.0, 8.0, 9.0, 6.0]],
dtype=np.float32)
np_expect_ious = np.asarray(
[[0.1111, 1.0000, 0.0000], [0.0000, 1.0000, 0.0000],
[0.0000, 0.0000, 1.0000]],
dtype=np.float32)
np_expect_ious_aligned = np.asarray([0.1111, 1.0000, 1.0000],
dtype=np.float32)

boxes1 = torch.from_numpy(np_boxes1).to(device)
boxes2 = torch.from_numpy(np_boxes2).to(device)

ious = box_iou_quadri(boxes1, boxes2, mode='iof')
assert np.allclose(ious.cpu().numpy(), np_expect_ious, atol=1e-4)

ious = box_iou_quadri(boxes1, boxes2, mode='iof', aligned=True)
assert np.allclose(
ious.cpu().numpy(), np_expect_ious_aligned, atol=1e-4)
进入 mmcv/tests/test_ops 目录后,执行以下命令测试该单元测试用例:
pytest -s test_box_iou_quadri.py
测试结果如下所示:

性能优化
profiler 工具
可以使用 torch_musa 对 PyTorch 官方性能分析工具(官方示例)
torch.profiler 适配的版本来对模型 进行性能分析,
torch_musa 模块的导入必须在 torch.profiler 或者 torch.autograd.profiler 模块
导 入之前,如下是一个最佳实践:
import torch
import torch_musa
import torchvision.models as models
from torch.profiler import profile, record_function, schedule
import torch.nn as nn
import torch.optim
import torch.utils.data
import torchvision
import torchvision.transforms as T


model = models.resnet50(weights=models.ResNet50_Weights.IMAGENET1K_V1)
model.musa()
transform = T.Compose([T.Resize(256), T.CenterCrop(224), T.ToTensor()])
trainset = torchvision.datasets.CIFAR10(root='./data', train=True,
download=True, transform=transform)
trainloader = torch.utils.data.DataLoader(trainset, batch_size=32,
shuffle=True, num_workers=0)
criterion = nn.CrossEntropyLoss().musa()
optimizer = torch.optim.SGD(model.parameters(), lr=0.001, momentum=0.9)
device = torch.device("musa:0")
model.train()

my_schedule = schedule(
    skip_first=1,
    wait=1,
    warmup=1,
    active=2,
    repeat=2)

def trace_handler(p):
    output = p.key_averages().table(sort_by="self_musa_time_total", row_limit=10)
    print(output)
    p.export_chrome_trace("/tmp/trace_" + str(p.step_num) + ".json")

# with_stack=True requires experimental_config's setting at torch 2.0.0 which has not resolved the issue, https://github.com/pytorch/pytorch/issues/100253
with profile(
    schedule=my_schedule,
    on_trace_ready=trace_handler,
    profile_memory=True,
    record_shapes=True,
    with_stack=True,
    experimental_config=torch._C._profiler._ExperimentalConfig(verbose=True)
    ) as prof:
    with record_function("model_training"):
        for step, data in enumerate(trainloader, 0):
            print("step:{}".format(step))
            inputs, labels = data[0].to(device=device), data[1].to(device=device)
            outputs = model(inputs)
            loss = criterion(outputs, labels)
            optimizer.zero_grad()
            loss.backward()
            optimizer.step()
            prof.step()
            if step >= 10:
                break

print(prof.key_averages(group_by_input_shape=True).table(sort_by="musa_time_total", row_limit=10))
print(prof.key_averages(group_by_stack_n=5).table(sort_by="self_musa_time_total", row_limit=2))
# clone FlameGraph and execute `./flamegraph.pl --title "MUSA time" --countname "us." /tmp/profiler_stacks.txt > perf_viz.svg`
prof.export_stacks("/tmp/profiler_stacks.txt", "self_musa_time_total")
上述的一个例子基本涵盖了在使用 profiler 分析模型在单机单卡上训练或推理情景下,各种参数使用时所导出的结果情况。其中,
-
record_shapes 指定是否记录算子输入的形状
-
profile_memory 指定是否记录算子执行过程中发生的内存分配和释放的总量
-
schedule 指定 profiler 分析的调度函数,遵循 skip_first->[wait->warmup->active]->[wait->warmup->active]...,[]作为一个周期,其中
-
skip_first 表明跳过初始的步数
-
wait 表明要等待的步数
-
warmup 表明热身的步数
-
active 表明正常工作的步数
-
repeat 表明周期数
-
-
on_trace_ready 指定函数来在每个周期结束后对新产生的 trace 进行处理
注意,在当前适配的 profiler 版本中,use_musa 和 activities
参数无效,这两个参数的设定不会影响 profiler 的配置。
使能 TensorCore 优化
M1000 支持 TensorFloat32(TF32) tensor cores。利用 tensor cores,可以使得 矩阵乘 和
卷积 计算得 到加速。torch_musa 中 TF32 的使用方式和 CUDA 中一致,可以参考
PyTorch 官方示例
。快速入门章节也提供了示例代码,见使能 TensorCore 示例代码。需要注意的是,CUDA 中矩阵乘和卷积计算是分开控制的,而在 torch_musa 中是统一控制的,代码差异如下所示。在 torch_musa 中
allow_tf32 默认值是 False。
import torch
# The flag below controls whether to allow TF32 on matmul. This flag defaults to False
# in PyTorch 1.12 and later.
torch.backends.cuda.matmul.allow_tf32 = True

# The flag below controls whether to allow TF32 on cuDNN. This flag defaults to True.
torch.backends.cudnn.allow_tf32 = True

import torch_musa
# The flag below controls whether to allow TF32 on muDNN. This flag defaults to False.
torch.backends.mudnn.allow_tf32 = True
在 M1000 上,对于具有卷积算子的模型,使能 NHWC layout 优化 ,可以使得性能得到提升,示例代码 如下:
import torch
import torch_musa

torch.backends.mudnn.allow_tf32 = True
model = Model() # define model here
model = model.to(memory_format=torch.channels_last) # transform layout to NHWC
调试工具
异常算子对比和追踪工具使用指南
概述
该工具通过提供跨设备比较张量算子、跟踪模块层次结构和检测 NaN/Inf 值的能力,增强 PyTorch 模型的调试和验证过程,帮助确保模型在开发和测试各阶段的正确性和稳定性。
功能
基本用法
与 CPU 比较算子
将张量算子的输出与 CPU 结果比较,以确保在不同设备上的一致性和正确性。这对于自定义算子或验证 设备特定实现至关重要。
from torch_musa.utils.compare_tool import CompareWithCPU

model = get_your_model()
with CompareWithCPU(atol=0.001, rtol=0.001, verbose=True):
train(model)
为了调试或性能评估,您可以使用enabled参数临时禁用比较:
with CompareWithCPU(enabled=False, atol=0.001, rtol=0.001, verbose=True):
    train(model)
模块跟踪
理解异常发生在哪个模块层次中与识别异常算子本身一样重要。要跟踪模块的层次结构并确定问题出现的位置,请启用模块跟踪器:
from torch_musa.utils.compare_tool import open_module_tracker, ModuleInfo

model = get_your_model()
open_module_tracker(model)
with CompareWithCPU(atol=0.001, rtol=0.001, verbose=True):
    train(model)
NaN/Inf 检测
虽然 CompareWithCPU 也能检测 NaN 和 Inf 值,但它需要在 CPU 上重新运行每个算子,这可能会很慢。 为了快速识别 NaN 或 Inf 而不显著降低性能,可以使用NanInfTracker,它完全在 GPU 上运行:
from torch_musa.utils.compare_tool import NanInfTracker

model = get_your_model()
with NanInfTracker():
    train(model)
日志结构和解释
每当模型执行算子时,该工具都会生成日志条目,包括算子的详细信息、输入输出数据、以及与 CPU 执行结果的比较。以下是一个典型的日志示例:
2024-04-07, 15:11:10
-------------------------  step = 1  ----------------------
GeminiDDP/ChatGLMModel/torch.ops.aten.view(forward) is in white_list, pass
GeminiDDP/ChatGLMModel/torch.ops.aten.ones(forward) starts to run ...
GeminiDDP/ChatGLMModel/torch.ops.aten.ones(forward) succeeds to pass CompareWithCPU test
...

GeminiDDP/ChatGLMModel/GLMTransformer/GLMBlock/SelfAttention/Linear/torch.ops.aten.addmm(forward) starts to run ...
"addmm_impl_cpu_" not implemented for 'Half'
Convert to float32 ...

============================
[ERROR] GeminiDDP/ChatGLMModel/GLMTransformer/GLMBlock/SelfAttention/Linear/torch.ops.aten.addmm(forward) fails to pass CompareWithCPU test
....... input .........
0: Tensor <shape=torch.Size([6144]), dtype=torch.float16, device=musa:0, size=6144, >,
1: Tensor <shape=torch.Size([24576, 5120]), dtype=torch.float16, device=musa:0, size=125829120, >,
2: Tensor <shape=torch.Size([5120, 6144]), dtype=torch.float16, device=musa:0, size=31457280, >,


...... output ........
Tensor <shape=torch.Size([24576, 6144]), dtype=torch.float16, device=musa:0, size=150994944, >

...... compare with cpu .......
Tensor values are not close

Too many indices (total 20581473) to print

...

Element at index (0, 14) is not close: -0.84521484375(musa:0) vs -0.8450137972831726(cpu)
Element at index (0, 42) is not close: -1.1943359375(musa:0) vs -1.1947154998779297(cpu)
Element at index (0, 46) is not close: -1.025390625(musa:0) vs -1.0250622034072876(cpu)
Element at index (0, 52) is not close: 0.552734375(musa:0) vs 0.5529251098632812(cpu)
Element at index (0, 54) is not close: 0.72216796875(musa:0) vs 0.7219759225845337(cpu)
Element at index (0, 57) is not close: -1.310546875(musa:0) vs -1.3108956813812256(cpu)
Element at index (0, 59) is not close: -0.52734375(musa:0) vs -0.5271496176719666(cpu)
Element at index (0, 67) is not close: -0.5302734375(musa:0) vs -0.5304464101791382(cpu)
Element at index (0, 77) is not close: 0.89306640625(musa:0) vs 0.8932651281356812(cpu)
Element at index (0, 80) is not close: 0.56787109375(musa:0) vs 0.5681084394454956(cpu)
Element at index (0, 84) is not close: 1.3388671875(musa:0) vs 1.338517427444458(cpu)
Element at index (0, 95) is not close: -1.302734375(musa:0) vs -1.3023890256881714(cpu)
Element at index (0, 100) is not close: -0.64306640625(musa:0) vs -0.6428374648094177(cpu)
Element at index (0, 116) is not close: -0.79150390625(musa:0) vs -0.7917078733444214(cpu)
Element at index (0, 130) is not close: -0.53271484375(musa:0) vs -0.5329336524009705(cpu)
Element at index (0, 142) is not close: 1.2939453125(musa:0) vs 1.2935254573822021(cpu)
Element at index (0, 146) is not close: -0.69970703125(musa:0) vs -0.6995066404342651(cpu)
Element at index (0, 154) is not close: -0.5751953125(musa:0) vs -0.5753999352455139(cpu)
Element at index (0, 156) is not close: 0.53759765625(musa:0) vs 0.5373584032058716(cpu)
Element at index (0, 160) is not close: -0.56005859375(musa:0) vs -0.5602396726608276(cpu)

...

Tensor <shape=torch.Size([24576, 6144]), dtype=torch.float16, device=musa:0, size=150994944, >
tensor([[ 0.2247,  0.1085,  0.5469,  ...,  0.0325,  0.6895,  0.7295],
        [-0.7515, -0.6138, -0.5361,  ..., -0.7559,  1.2334,  0.7021],
        [ 0.0715,  0.1360, -1.0371,  ...,  0.6582,  0.8247, -0.0663],
        ...,
        [ 0.1399, -0.5474,  0.4290,  ...,  0.0474,  0.2852, -0.2908],
        [-0.5698, -0.1058, -0.5020,  ...,  0.2175, -0.4563, -0.5186],
        [ 0.6357, -0.9258, -0.2781,  ...,  0.8784, -0.5474, -0.0219]],
    device='musa:0', dtype=torch.float16)
Tensor <shape=torch.Size([24576, 6144]), dtype=torch.float32, device=cpu, size=150994944, >
tensor([[ 0.2247,  0.1085,  0.5469,  ...,  0.0325,  0.6893,  0.7297],
        [-0.7515, -0.6137, -0.5364,  ..., -0.7560,  1.2333,  0.7019],
        [ 0.0716,  0.1359, -1.0372,  ...,  0.6582,  0.8247, -0.0663],
        ...,
        [ 0.1399, -0.5473,  0.4289,  ...,  0.0474,  0.2851, -0.2909],
        [-0.5701, -0.1058, -0.5019,  ...,  0.2176, -0.4562, -0.5184],
        [ 0.6358, -0.9257, -0.2781,  ...,  0.8782, -0.5475, -0.0219]])

============================
-
算子细节:每个条目展示了执行的算子、其输入和输出细节,以及比较的结果。
-
错误识别:错误清晰标记,详细描述了设备间算子输出的差异。
-
定位异常:可以搜索"[WARNING]" 来定位 NaN/Inf 出现的位置,搜索"[ERROR]" 来定位与 CPU 比较 失败的操作。
处理检测后的异常
一旦检测到异常,该工具提供了几种策略来解决和解决这些问题:
1、隔离特定算子
通过将有问题的算子添加到target_list,只比较异常算子,加快调试过程。
from torch_musa.utils.compare_tool import CompareWithCPU, open_module_tracker

model = get_your_model()
open_module_tracker(model)
with CompareWithCPU(atol=0.001, rtol=0.001, target_op=['torch.ops.aten.addmm']):
    train(model)
2、调整公差
如果一个算子几乎通过比较,但刚好超出公差一点点,调整atol和rtol可能会有所帮助。
from torch_musa.utils.compare_tool import CompareWithCPU, open_module_tracker

model = get_your_model()
open_module_tracker(model)
with CompareWithCPU(atol=0.01, rtol=0.01, target_op=['torch.ops.aten.addmm']):
3、白名单
对于已知和预期的异常算子,将算子添加到white_list可以将其从进一步比较中排除。
from torch_musa.utils.compare_tool import CompareWithCPU, open_module_tracker

model = get_your_model()
open_module_tracker(model)
with CompareWithCPU(atol=0.001, rtol=0.001, white_list=['torch.ops.aten.addmm']):
    train(model)
4、调试和复现问题
对于不符合预期的异常,启用dump_error_data保存失败算子的输入/输出。程序会在第一次未通过比较 测试时中断,异常算子的输入和输出分别保存在path_to_save/op_name_inputs.pkl和path_to_save/op_name_outputs.pkl中,方便单元测试复现。
from torch_musa.utils.compare_tool import CompareWithCPU, open_module_tracker

model = get_your_model()
open_module_tracker(model)
with CompareWithCPU(atol=0.01, rtol=0.01, verbose=True, target_op=['torch.ops.aten.addmm'], dump_error_data=True, output_dir='path_to_save'):
    train(model)
然后用保存的输入和输出进行单元测试复现:
from torch_musa.utils.compare_tool import compare_for_single_op

correct, args, kwargs, out = compare_for_single_op('path_to_save/torch.ops.aten.addmm_inputs.pkl', torch.ops.aten.addmm, atol=0.01, rtol=0.01)
只检测 Nan/Inf 时也类似:
from torch_musa.utils.compare_tool import nan_inf_track_for_single_op

correct, args, kwargs, out = nan_inf_track_for_single_op('path_to_save/torch.ops.aten.addmm_inputs.pkl', torch.ops.aten.addmm)
训练步骤控制
在 AMP 场景中,初始训练步骤的 scale 很大,容易产生 NaN/Inf 值,干扰异常算子的定位。通过设置start_step和end_step,并调用step()来增加step_cnt,控制何时激活比较或 NaN/Inf 跟踪。只有当start_step <= step_cnt < end_step时,CompareWithCPU 和 NanInfTracker 才会激活。
from torch_musa.utils.compare_tool import open_module_tracker, ModuleInfo

model = get_your_model()
open_module_tracker(model)
with CompareWithCPU(atol=0.001, rtol=0.001, verbose=True, start_step=5) as compare_with_cpu:
    for epoch in range(epoch_num):
        for step in range(step_num):
            train_step(model)
            compare_with_cpu.step()
结论
比较和跟踪工具是开发人员和研究人员在 PyTorch 模型上工作时的重要工具。它结合了几个高级功能,旨在增强模型开发过程,确保模型算子在各种计算环境中的准确性和可靠性。
-
与 CPU 比较算子:此功能通过比较自定义或
GPU特定实现的输出和标准 CPU 结果,实现了对张量算子的精确验证。确保算子的一致性和正确性至关重要,特别是在跨不同硬件平台部署模型时。 -
模块跟踪:了解算子在模型中的上下文和层次结构可以显著简化调试和优化任务。模块跟踪允许开发 人员将异常追溯到模型结构中的源头,提供数据如何通过网络流动的清晰理解。
-
NaN/Inf 检测:识别 NaNs 和 Infs 的出现对于诊断模型中的数值不稳定至关重要。 NanInfTracker 功能提供了一种快速有效的方法,直接在
GPU上定位这些值,确保对性能的影响最小。 -
处理检测后的异常:一旦检测到问题,该工具提供了几种隔离、分析和解决策略。这包括隔离特定算子进行集中比较,调整公差水平以适应微小差异,将预期的异常算子添加到白名单中,以及为意外的异常算子转储数据以促进详细的调试和单元测试复现。
-
训练步骤控制 :在诸如
AMP训练之类的场景中,对何时激活比较和跟踪的自适应控制尤其有用,其中 初始条件可能会产生误导性的 NaN/Inf 值。此功能允许有针对性的调试工作,在训练过程的最相关阶段再激活工具。
通过提供一套全面的调试和验证工具,比较和跟踪工具显著促进了健壮、可靠和高性能 PyTorch 模型的开发。它对灵活性、效率和以用户为中心的设计的强调,使其成为任何旨在推动 PyTorch 可能性边界的开发人员工具包中的宝贵补充。
代码迁移示例——YOLOv5、ultralytics
本节以 YOLOv5、ultralytics 为例,介绍如何将开源社区中能够跑在 CUDA 上的深度学习模型训练代码加以修改,使其能够运行在摩尔线程 GPU 上。使用的代码为
ultralytics/yolov5,
ultralytics/ultralytics。
手动修改代码迁移
首先需要在训练脚本(本例中为 train.py 文件)中的
import torch 下一行添加 import
torch_musa。之后大部分情况下只需要将代码中的 cuda 或 CUDA 字符串修改为 musa 或 MUSA,nccl 修改为 mccl 即可。主要包含对模型训练代码中 device 设置(如 CPU/CUDA/MUSA)、DDP 通信后端设置(如 nccl/mccl)、混合精度训练设置和随机数种子设置等部分代码的修改。
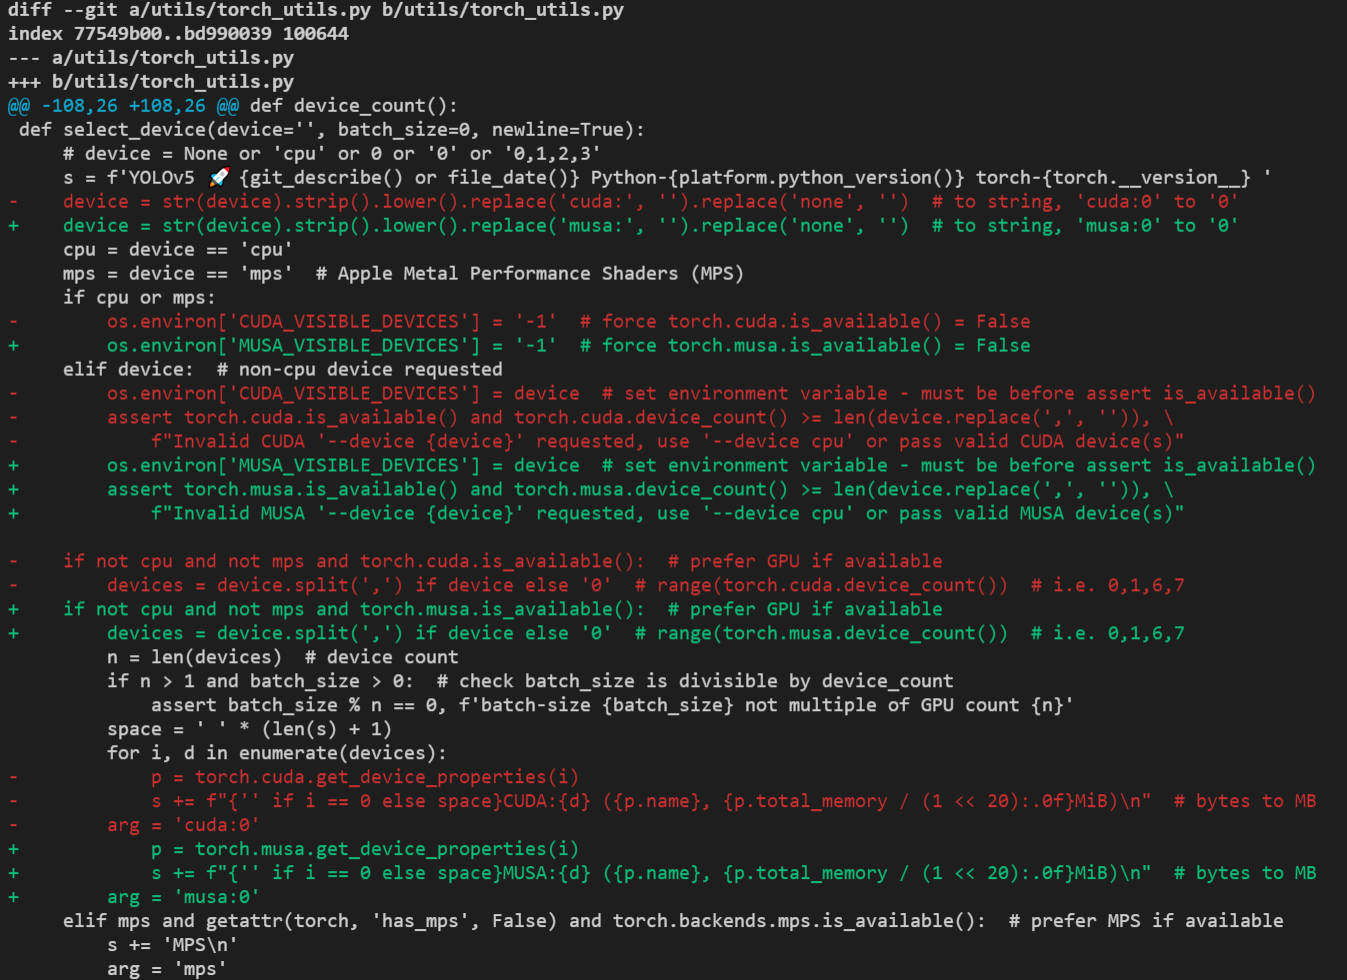
device 设置
修改 utils/torch_utils.py 文件中
select_device
函数,将 CUDA/cuda 相关字符串修改为 MUSA/musa, 修改前后代码改动如下图所示。
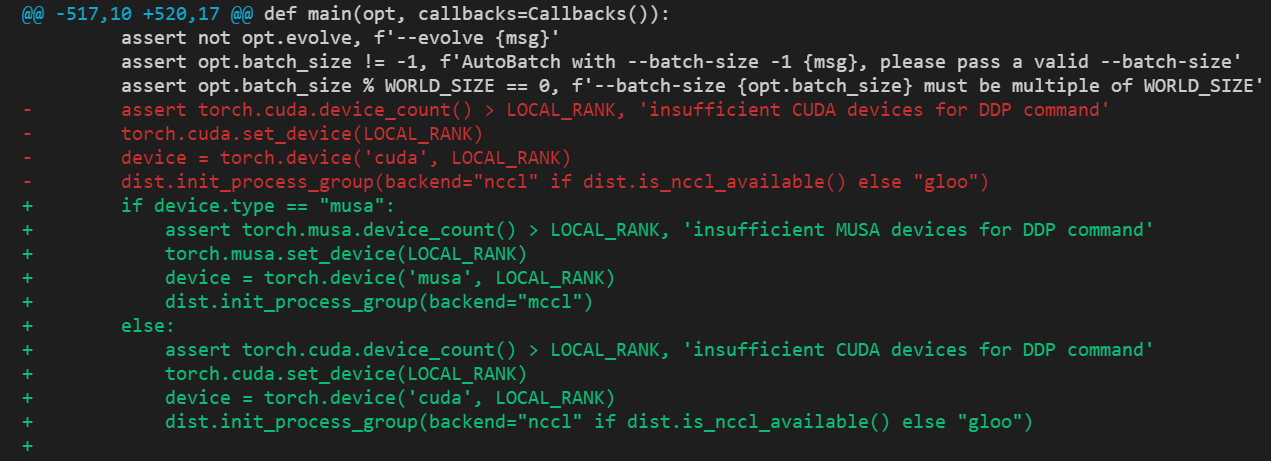
DDP 通信后端设置
修改 train.py 中 DDP 初始化相关代码
,将通信后端由 nccl 修改为 mccl,修改前后代码改动如下图所示。
混合精度训练设置
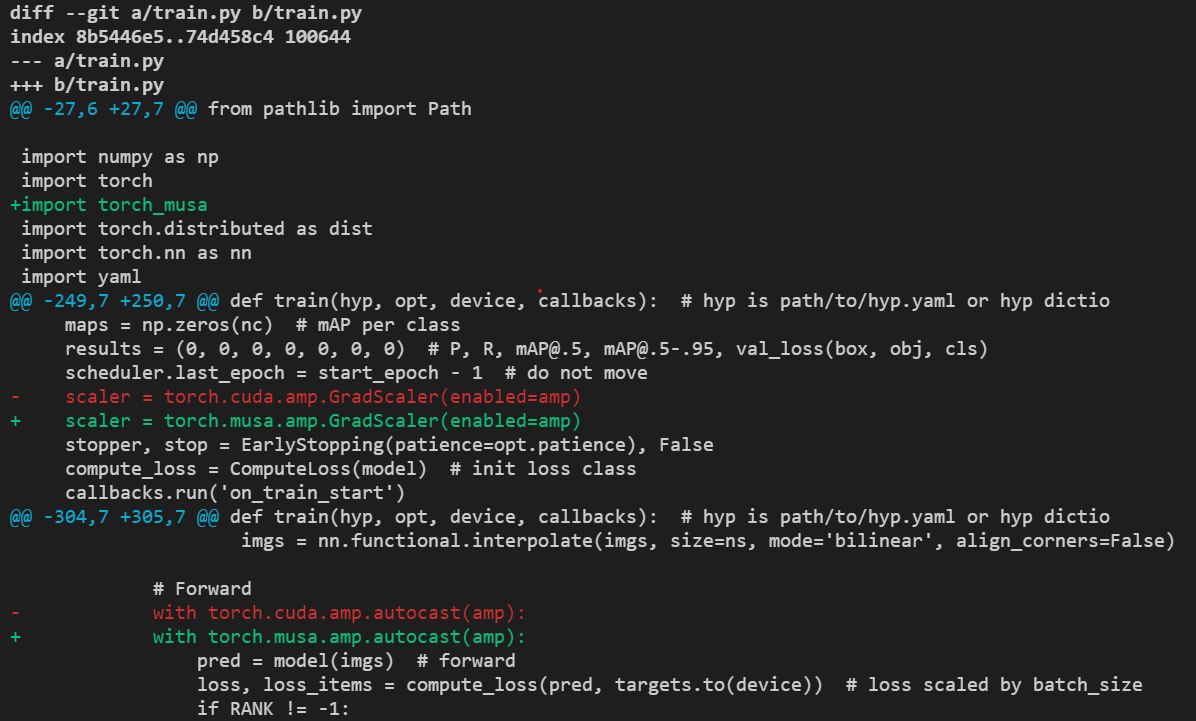
PyTorch 提供了混合精度训练的两个 python 前端接口 autocast 和 GradScaler,因此只需要将 cuda 接口修改为 torch_musa 的接口即可。本例中需要将 train.py 中的
torch.cuda.amp.autocast
修改 为 torch.musa.amp.autocast 或 torch_musa.amp.autocast;将
torch.cuda.amp.GradScaler
修改 为 torch.musa.amp.GradScaler 或 torch_musa.amp.GradScaler,修改前后代码改动如下图所示。
然后将 models/common.py 文件
第 26 行 的
from torch.cuda import amp 修改为 from torch_musa import amp 。
随机数种子设置
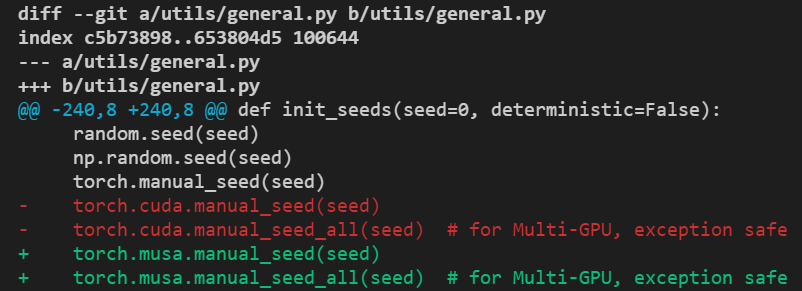
PyTorch 中可以使用 torch.cuda.manual_seed() 及 torch.cuda.manual_seed_all() 在一定程度上保证算法在 CUDA 上的可复现性,类似的,使用 torch_musa 时可以通过 torch.musa.manual_seed() 及 torch.musa.manual_seed_all() 在摩尔线程 GPU 上达到同样的效果,对 YOLOv5 中随机数种子相关代码(utils/general.py 文件)修改如下图:
其他
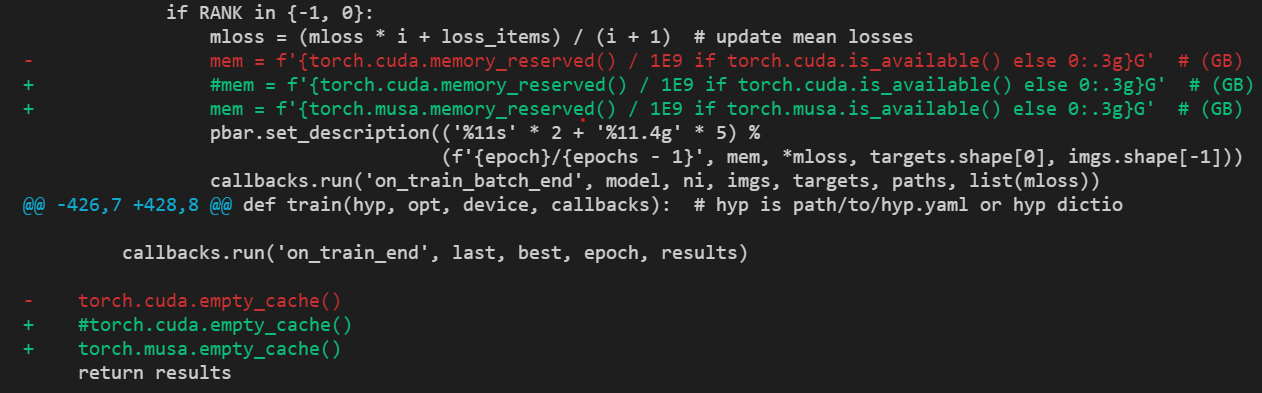
除以上修改外还需要修改 train.py 文件中 memory 相关接口 ,具体修改如下图所示。
完成以上修改后可执行如下命令测试 YOLOv5 在摩尔线程 GPU 上训练。
python train.py --data data/coco.yaml --weights yolov5m.pt --cfg models/yolov5m.yaml --batch-size 16 --device 0
基于 musa-converter 工具自动迁移
musa-converter 工具介绍
musa-converter 是 torch_musa 开发者提供的转换工具,可将能够在 CUDA 平台上运行的原生 PyTorch 训练/推理脚本转化为能够在 MUSA 平台上直接运行的脚本。
musa-converter 工具随着 torch_musa 一同被安装在环境中,
使用前需要安装相关依赖:
pip install filelock libcst==1.1.0
用户可以在命令行执行 musa-converter -h 查看使用说明,各个参数及其描述如下。
| 输入参数 | 描述 |
|---|---|
-r, --root_path | 待转换脚本的根路径,可以是文件或者目录 |
-l, --launch_path | 训练或推理的启动脚本路径(python 文件),当指定该路径时,转换工具会自动添加 import torch_musa 到文件中 |
-e, --excluded_path | 不想包含在转换过程中的文件路径,可以是一个或多个路径,以逗号分隔 |
使用 musa-converter 迁移 YOLOv5
在命令行中运行 musa-converter -r ./yolov5 -l ./yolov5/train.py。出现下图所示输出即表示转换完成。

之后用户便可以基于 torch_musa 进行 YOLOv5 的单卡和多卡训练测试。
注意:
由于在转换过程中会直接修改源文件,推荐在运行转换工具前将代码提前备份。
1、ipython 版本过高
pip install "ipython<8.0"
2、torch 2.6 之后 weight_only 默认 从 False 变为了 True
需要在项目中搜索 torch.load 函数,设置 weight_only=False 。
注解:
musa-converter 工具属于实验特性,用户在使用中遇到任何问题可以提出 issue 到
torch_musa GitHub 页面。
使用 musa-converter 迁移 ultralytics
下载源码
git clone -b v8.4.26 https://github.com/ultralytics/ultralytics.git
使用 musa-converter 修改代码
musa-converter -r ./ultralytics
安装该项目
cd ultralytics
pip install -e .
此时运行官方 yolov8n 的训练 demo
from ultralytics import YOLO

# Load a COCO-pretrained YOLOv8n model
model = YOLO("yolov8n.pt")

# Display model information (optional)
model.info()

# Train the model on the COCO8 example dataset for 100 epochs
results = model.train(data="coco8.yaml", epochs=100, imgsz=640)

# Run inference with the YOLOv8n model on the 'bus.jpg' image
results = model("path/to/bus.jpg")
发现 MT GPU 利用率明显上升,即在使用 MT GPU 进行训练。
FAQ
计算库无法找到
Q:如果在安装 torch_musa wheel 包后,import torch_musa 时报错无法找到 mudnn.so 库?
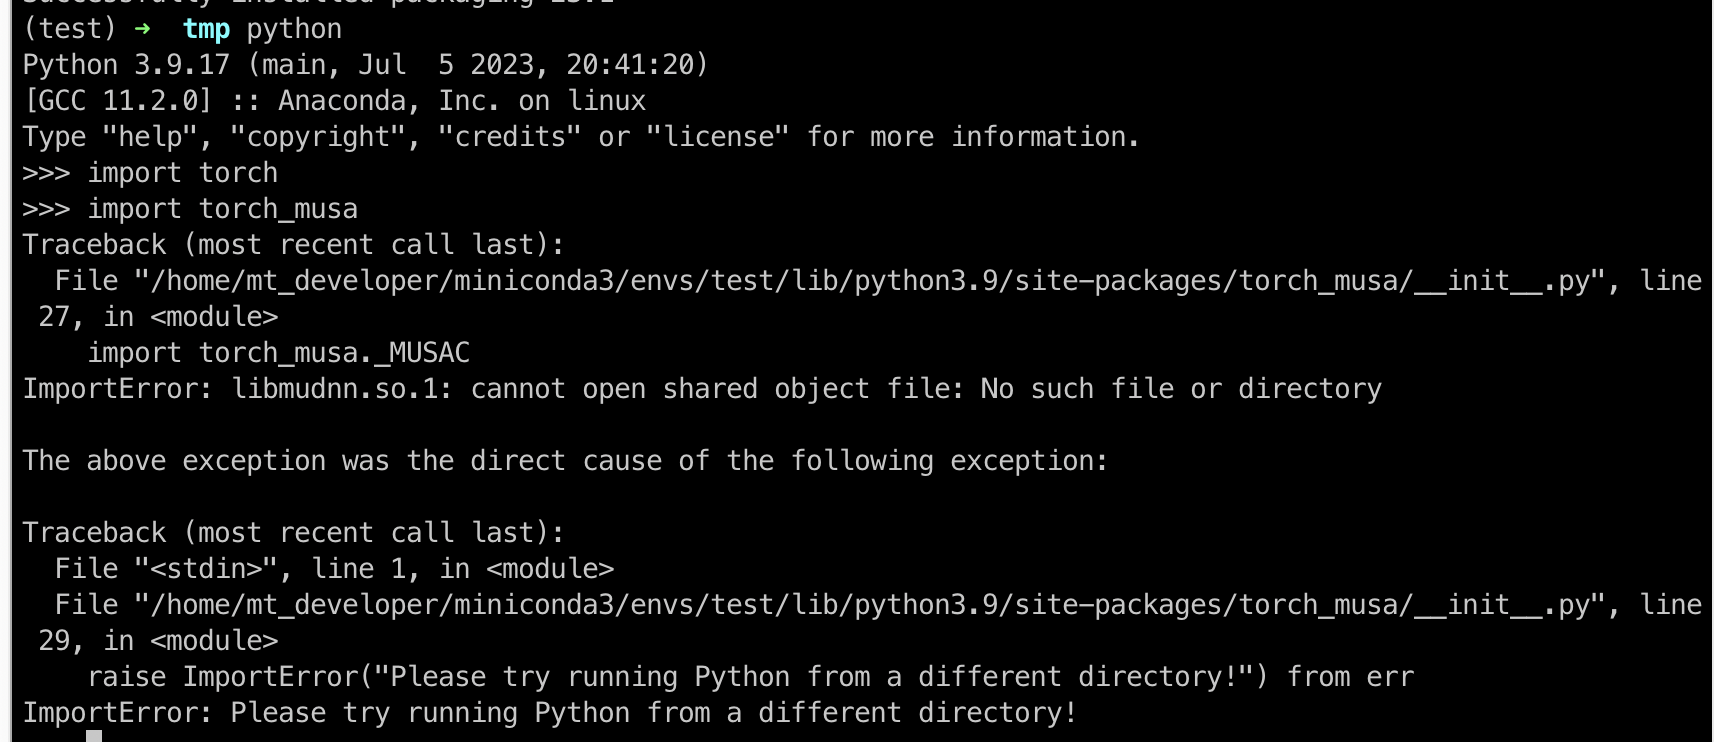
请确认 /usr/local/musa/lib/
目录下是否有该库,如果没有的话,需要安装该数学库;如果有的话,需要执行:
export LD_LIBRARY_PATH=$LD_LIBRARY_PATH:/usr/local/musa/lib
编译安装
- Q:如果在更新过
torch_musa最新代码后,编译报错?
- 请尝试
python setup.py clean
bash build.sh # 整体重新编译
如果还报错,可能是因为需要更新 MUSA 软件栈中某个底层软件包。
适配算子
Q:如果在 CUDA-Porting 适配新算子时,编译可以通过,在 import torch;import torch_musa
时报 错找不到符号?
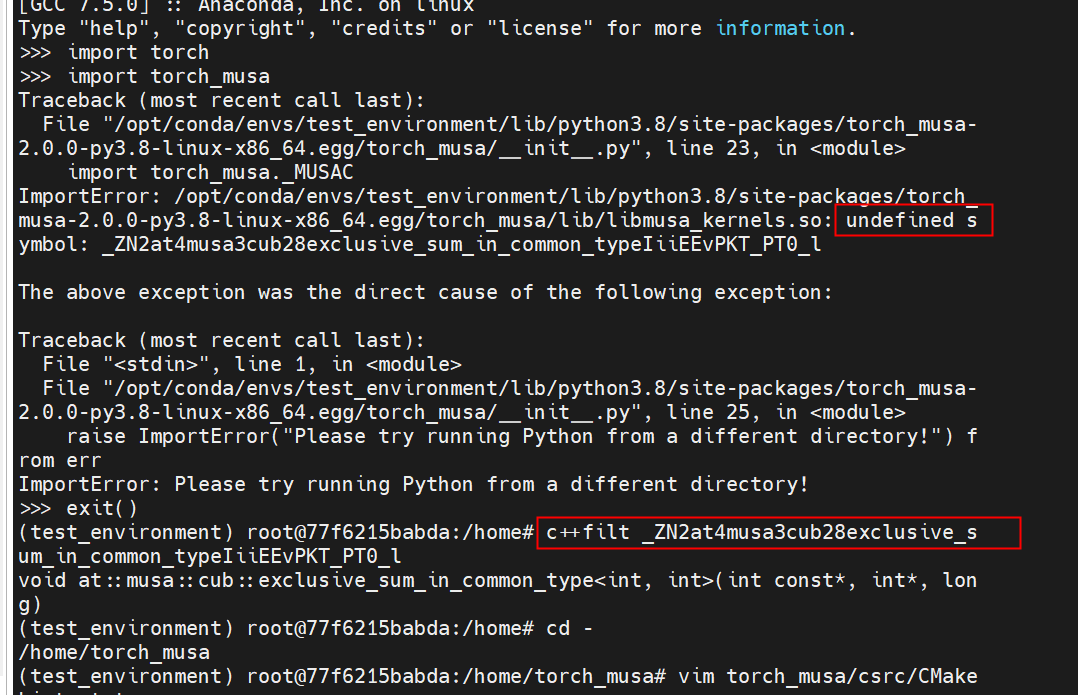
-
先用
c++filt查看符号名称 -
在
PyTorch源码中使用grep搜索该符号:
-
如果该符号定义在 cu 文件中,将该 cu 文件对应的****.mu 文件加入到
torch_musa/csrc/CMakeList.txt中即可。 -
如果该符号定义在 cpp 文件中,说明这是一个 bug,请向
torch_musa提交 issue。 -
如果
PyTorch中也没有该符号,请在/usr/local/musa/中使用grep搜索该符号,该符号可能由底层库定义。 -
如果找到该符号,请检查是否没有链接该底层库,查看命令可参考
ldd path/to/site-packages/torch_musa-2.0.0-py3.8-linux-x86_64.egg/torch_musa/lib/libmusa_kernels.so -
如果找到该符号,且已经链接对应底层库,可能底层库只暴露了该符号,但还未给出定义。如果是底层库暴露符号,但
porting的算子实际运行时没有调用该符号,可以在torch_musa中定义一个空实现,参考torch_musa/csrc/aten/ops/musa/unimplemented_functions.cpp。如果底层库暴露符号,且porting的算子实际运行需要调用该符号,可以向底层库提交需求。
- 如果上面都没有找到上述符号,可以在
CUDAPyTorch环境中使用grep搜索该符号,确认CUDA环境中的符号定义位置,再向对应MUSA软件模块提交需求。
问题与反馈
如果在开发或者使用 torch_musa 的过程中,遇到任何 bug 或者没支持的特性,请积极向
torch_musa
提交 issue。提交 issue 时,请给出复现问题的代码、报错 log,并打上对应标签,如下面例子所示: