环境准备与部署
warning
注意:本指南目前只适用于 M1000 AIBook 环境,需要 AIOS 1.3.3 操作系统。
Step1 确认环境
确认操作系统版本
仅支持AIOS 1.3.3,请先和设备提供方确认设备是否是 AIOS 1.3.3 可在设置-关于-操作系统名称查看AIOS版本
确认 musa 环境
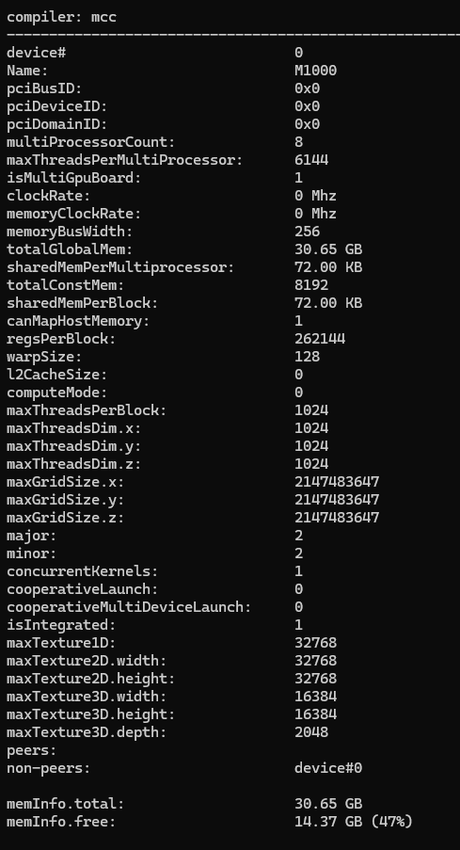
执行 musaInfo,输出正常则环境配置正确。
Step2 下载安装包
wget https://mt-ai-data.tos-cn-shanghai.volces.com/vllm_musa/v1.3.1/release_1.3.3/20260302/AIBook-release_1.3.3-vllm_musa_1.3.1-torch_2.1.1.tar.gz
# 内网链接
wget -c http://ai-daily.sh-moss.mthreads.com:80/vllm_musa/v1.3.1/release_M1000_1.3.3/20260206/AIBook-release_1.3.3-vllm_musa_1.3.1-torch_2.1.1.tar.gz
tar zxvf AIBook-release_1.3.3-vllm_musa_1.3.1-torch_2.1.1.tar.gz
cd AIBook-release_1.3.3-vllm_musa_1.3.1-torch_2.1.1
【可选】新建 conda 环境(推荐)
# 下载 Miniforge3 (默认带 Python 3.10) for Linux-aarch64
chmod +x Miniforge3-Linux-aarch64.sh

./Miniforge3-Linux-aarch64.sh
# 安装过程中需要输入 yes, 并回车确认安装路径,默认安装路径在 /home/$User 下

source ~/.bashrc

# 创建一个 python 3.10 的环境,安装过程中需要输入 y,并回车确认
conda create -n v1.3.1 python=3.10
conda activate v1.3.1
Step3 安装 torch musa
安装脚本
# 加代理提高 pip install 速度,当前环境执行一次即可
pip config set global.index-url https://mirrors.tuna.tsinghua.edu.cn/pypi/web/simple

pip3 install torch-2.5.0-cp310-cp310-linux_aarch64.whl
pip3 install torch_musa-2.1.1-cp310-cp310-linux_aarch64.whl
pip3 install torchaudio-2.5.0a0+56bc006-cp310-cp310-linux_aarch64.whl
pip3 install torchvision-0.20.0a0+afc54f7-cp310-cp310-linux_aarch64.whl
环境验证
输出 true 证明 torch_musa 环境安装正确:
python3 -c "import torch;import torch_musa;print(torch.musa.is_available())"
说明
- 输出
mudnn.so找不到,执行:export PATH=/usr/local/musa/bin:${PATH}export LD_LIBRARY_PATH=/usr/local/musa/lib:${LD_LIBRARY_PATH} - 输出
Error in cpuinfo: prctl(PR_SVE_GET_VL) failed正常 - 如果 NumPy 报错,如
Failed to initialize NumPy或者numpy ModuleNotFoundError: No module named 'numpy',执行pip3 install numpy==1.26.4 - 如果报错
ImportError: libmccl.so.2: cannot open shared object file: No such file or directory,需要重装 mccl,重装后直接执行这一步。流程参考 Step1 章节 - 如果报错
MUSA driver initialization failed,设备需要连接显示器,输入用户名密码进入桌面。如果没有安全需求,推荐在"设置"->"用户"界面设置为自动登录
Step4 安装相关依赖
安装脚本
# 安装过程中需要输入 y,并回车确认
sudo apt update
sudo apt install python3-pip git cmake wget build-essential g++ libstdc++-12-dev libnuma-dev
pip3 install -r requirements.txt
pip3 install triton-3.1.0-cp310-cp310-linux_aarch64.whl
Step5 安装 vllm musa
安装脚本
pip3 install vllm-0.9.2.dev259+gc2cd4356d-cp310-cp310-linux_aarch64.whl
pip3 install vllm_musa-1.3+m1000-cp310-cp310-linux_aarch64.whl
tip
安装vllm_musa时出现依赖冲突,不影响后续模型推理
ERROR: pip's dependency resolver does not currently take into account all the packages that are installed. This behaviour is the source of the following dependency conflicts. datasets 4.6.1 requires pyarrow>=21.0.0, but you have pyarrow 20.0.0 which is incompatible. vllm 0.9.2.dev259+gc2cd4356d requires numpy==1.26.1, but you have numpy 1.26.4 which is incompatible.
环境验证
没有报错证明 vllm_musa 环境安装正确:
cd /home && python3 -c "from vllm_musa import _musa_custom_ops;_musa_custom_ops.decode_mla"
正常输出如下:
Error in cpuinfo: prctl(PR_SVE_GET_VL) failed
tip
如果 NumPy 报错,如 Failed to initialize NumPy 或者 numpy ModuleNotFoundError: No module named 'numpy',执行 pip3 install numpy==1.26.4
【可选】打开性能模式(推荐)
界面右上角: 电源 -> 性能